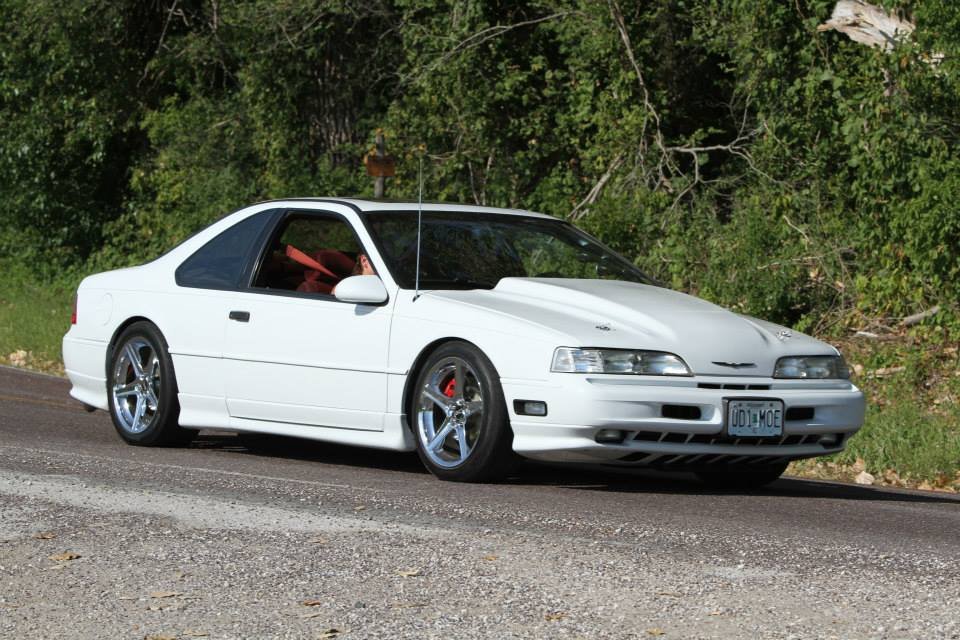
Power is supplied by an overhead valve 38 litre supercharged 6 cylinder engine with 2 valves per cylinder that develops power and torque figures of 210 bhp 213 PS157 kW at 4000 rpm and 427 Nm 315 lbft435 kgm at 2600 rpm respectively. Rated at 140 horsepower 100 kW at 3800 rpm and 215 lbft 292 Nm of torque at 2400 rpm many felt the engine was somewhat underpowered for a car that weighed over 3500 pounds 1600 kg in base trim heavier when equipped with available options.
 Ford Thunderbird Sc Specs 0 60 Performance Data Fastestlaps Com
Find detailed gas mileage information insurance.

1990 thunderbird sc specs. 90 Thunderbird Sc performance- very quick brakes are good and you can slam this thing into the corners. 1565 kW 210 hp 213 PS SAE net torque. Only special 16 by seven-inch cast aluminum wheels lower body side cladding and a Thunderbird SC embossed rear bumper separated the Super Coupe from its base model trim.
Save money on Used 1990 Ford Thunderbird SC models near you. If you drive or plan to buy 1990 Ford Thunderbird SC then you should know what all the characteristics mentioned in the pamphlet mean to you. Research 1990 Ford Thunderbird 2 Door Super Coupe prices used values Thunderbird 2 Door Super Coupe pricing specs and more.
With 210 horsepower and 315 pound-feet of torque the Super Coupe was a wolf in sheeps clothing. The base and LX models were powered by Fords 38 L Essex OHV V6. Bolted to Fords 38-liter V6 it boosted power from 145 hp to 210.
A more sophisticated supercharged and intercooled version of the 38 L OHV V6 was used to power the high performance Thunderbird Super Coupe also called Thunderbird SC for short. The SC was a handler too its 085 lateral g in league with the smaller lighter IROC Camaro but with a far more supple ride. Range in miles ctyhwy.
Ford Thunderbird SC Models History. At the heart of the Super Coupe was another SC a supercharger. Detailed features and specs for the Used 1990 Ford Thunderbird SC including fuel economy.
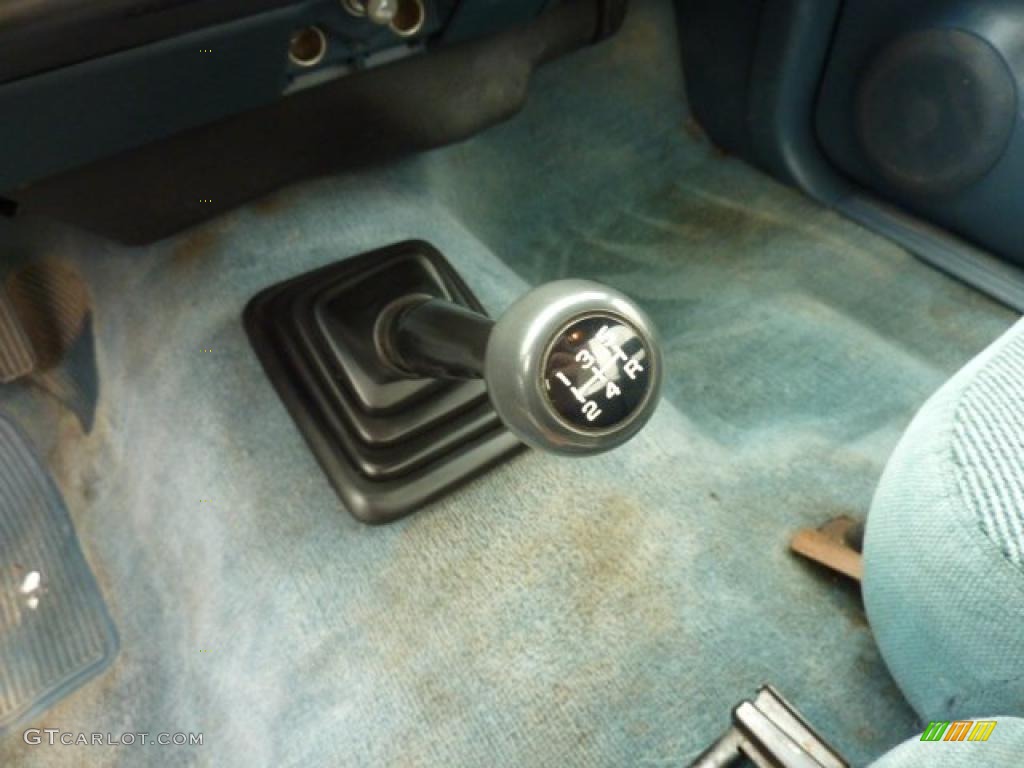
427 Nm 315 lb-ft more data. The auto ride autofirm adjustable shocks work well build quality- very well exept these engines are kind of a lemon and needs head gaskets appenance- not for everyone but i like the way it looks cost- and expensive car to fix but really good milage fun factor- this car is very fun to drive. The SC was also the only Thunderbird of this generation available with a manual transmission a Mazda-sourced five speed although this example is equipped with Fords AOD four-speed automatic.
The Thunderbird SCs 38-liter supercharged V-6 made 210 horsepower and 310 lb-ft. 1990 Ford Thunderbird SC man. 1990 Ford Thunderbird 2dr SC Supercharged Coupe 10900 189 mo 189 mo 63289.
Edmunds has detailed price information for the Used 1990 Ford Thunderbird SC. This automobile has a 2 door coupe body style with a front located engine powering the rear wheels. Rather than go with the 50L V-8 Ford chose to equip the Super Coupe with a 210hp supercharged 38L V-6.
38l v6 ohv 12v fi engine. Ford Thunderbird 1990 - Find out the correct alloy wheel fitment PCD offset and such specs as bolt pattern thread sizeTHD center boreCB for Ford Thunderbird 1990. 1990 Ford Thunderbird LX Coupe 38L V6 4-speed Automatic.
Shane aka SVTman74 was able to share Ford Thunderbird SC Specs in Adobe PDF format these files are hard manufacturer data and are about 1 to 15 meg a piece. All specifications performance and fuel economy data of Ford Thunderbird SC 1565 kW 213. The greatest car manufacturing companies that sell their vehicles all over the world have a long and interesting history of formation and development.
140 hp 3800 rpm. 1990 - 1995 years. Of torque later upgraded to 230 hp 330 lb-ft.
Gasoline petrol engine with displacement. Some SC parts are scarce. Super Coupe Club of America SC Literature SC Specs.
3797 cm3 2314 cui advertised power. Compared to the 300hp Mustang GTs and 500hp Shelby GT500s the specs of a 90 Thunderbird.
Use hands to push in both sides of the glove box so that it comes out of its guide and sags down. Press your CD players power and eject buttons down at the.
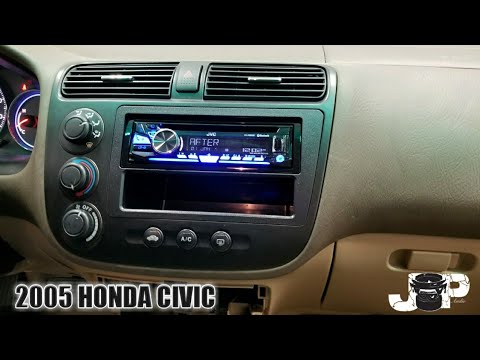 2005 Honda Civic Radio Removal Youtube
Honda Civic How to Remove and Replace Front Speaker.
Removing honda civic radio. How do you remove the radio on a 2005 civic lx - Answered by a verified Mechanic for Honda We use cookies to give you the best possible experience on our website. To Access Your Honda Radio Code from a Dealership. To Access Your Honda Radio Code via Phone.
Use a medium flat head screwdriver to pry up and remove the two connectors. I Will not accept any blame for whatever harm may come to you your vehicle or your radio. By continuing to use this site you consent to the use of cookies on your device as described in our cookie policy unless you have disabled them.
Instructions on how to remove the radio for a 2008 honda civic si sedan - Answered by a verified Mechanic for Honda We use cookies to give you the best possible experience on our website. Look for the connectors that have several wires coming out of them. Because this method doesnt require you to tamper with your CD player in any way its smart to start here - you have nothing to lose if it doesnt work.
Remove 2 Phillips screws from left hand side of the dash. Attempt at your own risk. 22 Twist speaker to remove from back of door panel at top through door panel remove connector from speaker.
Call Honda America Client Services at 1-800-999-1009. Locations of clips on the lower dash. 21 Remove three screws securing speaker to door panel.
11 Pull bottom leading edge of grill cover from door panel. Some CD players have a force eject function thats specifically designed to get CDs out when other methods have failed. To remove the Honda factory radio 2 two screws at the rear of the radio must be removed from underneath the radio which cab be accessed once the lower dash panel has been removed.
This screw is under the climate control section of your dashboard. By continuing to use this site you consent to the use of cookies on your device as described in our cookie policy unless you have disabled them. Remove 2 Phillips screws above the cigarette lighter.
How to Remove The factory radio on a 96-98 1996 1997 1998 Honda Civic DX EX LX This video will show you how to install a aftermarket radio into a 1996 Honda. You will be required to provided your VIN number radio serial number as well as proof of ownership. Resetting the radio in your Honda is usually as simple as pressing a couple of buttons but in rare cases you may need to enter a security code to regain operation of the radio.
Removing the Dash Panel and Radio from a 2014 Honda CivicToday we are removing the dash panel on a 2014 Honda CivicDetailed video of how to take out the pa. How to Reset My Honda Radio After Putting in a New Battery by Robert Moore. How to remove a car stereo from a Honda Civic MK8 2005 2006 2007 2008 2009 2010 and 2011Tools RequiredBojo Trim ToolPhillips Screw DriverCommentated fo.
Layout of radio to be removed. Step 1 Turn the car off. I cannot be held responsible for any damage done to your vehicleTools used-2 plastic panel poppers-8mm ratcheting wrenchIntro mus.
Push the panel from behind to give you better access to your radio and slider box. Drive to your local Honda or Acura dealer and provide your radio serial number and proof. Quick guide to remove the digital clockradio interface for Honda Civic hatchback 2010 model.
First turn your car off if it isnt already1 X Research sourceStep 2 While the car is off hold the power and the eject button. Remove 3 Phillips screws and unclip dash. This process can take some time but will vary based on you.
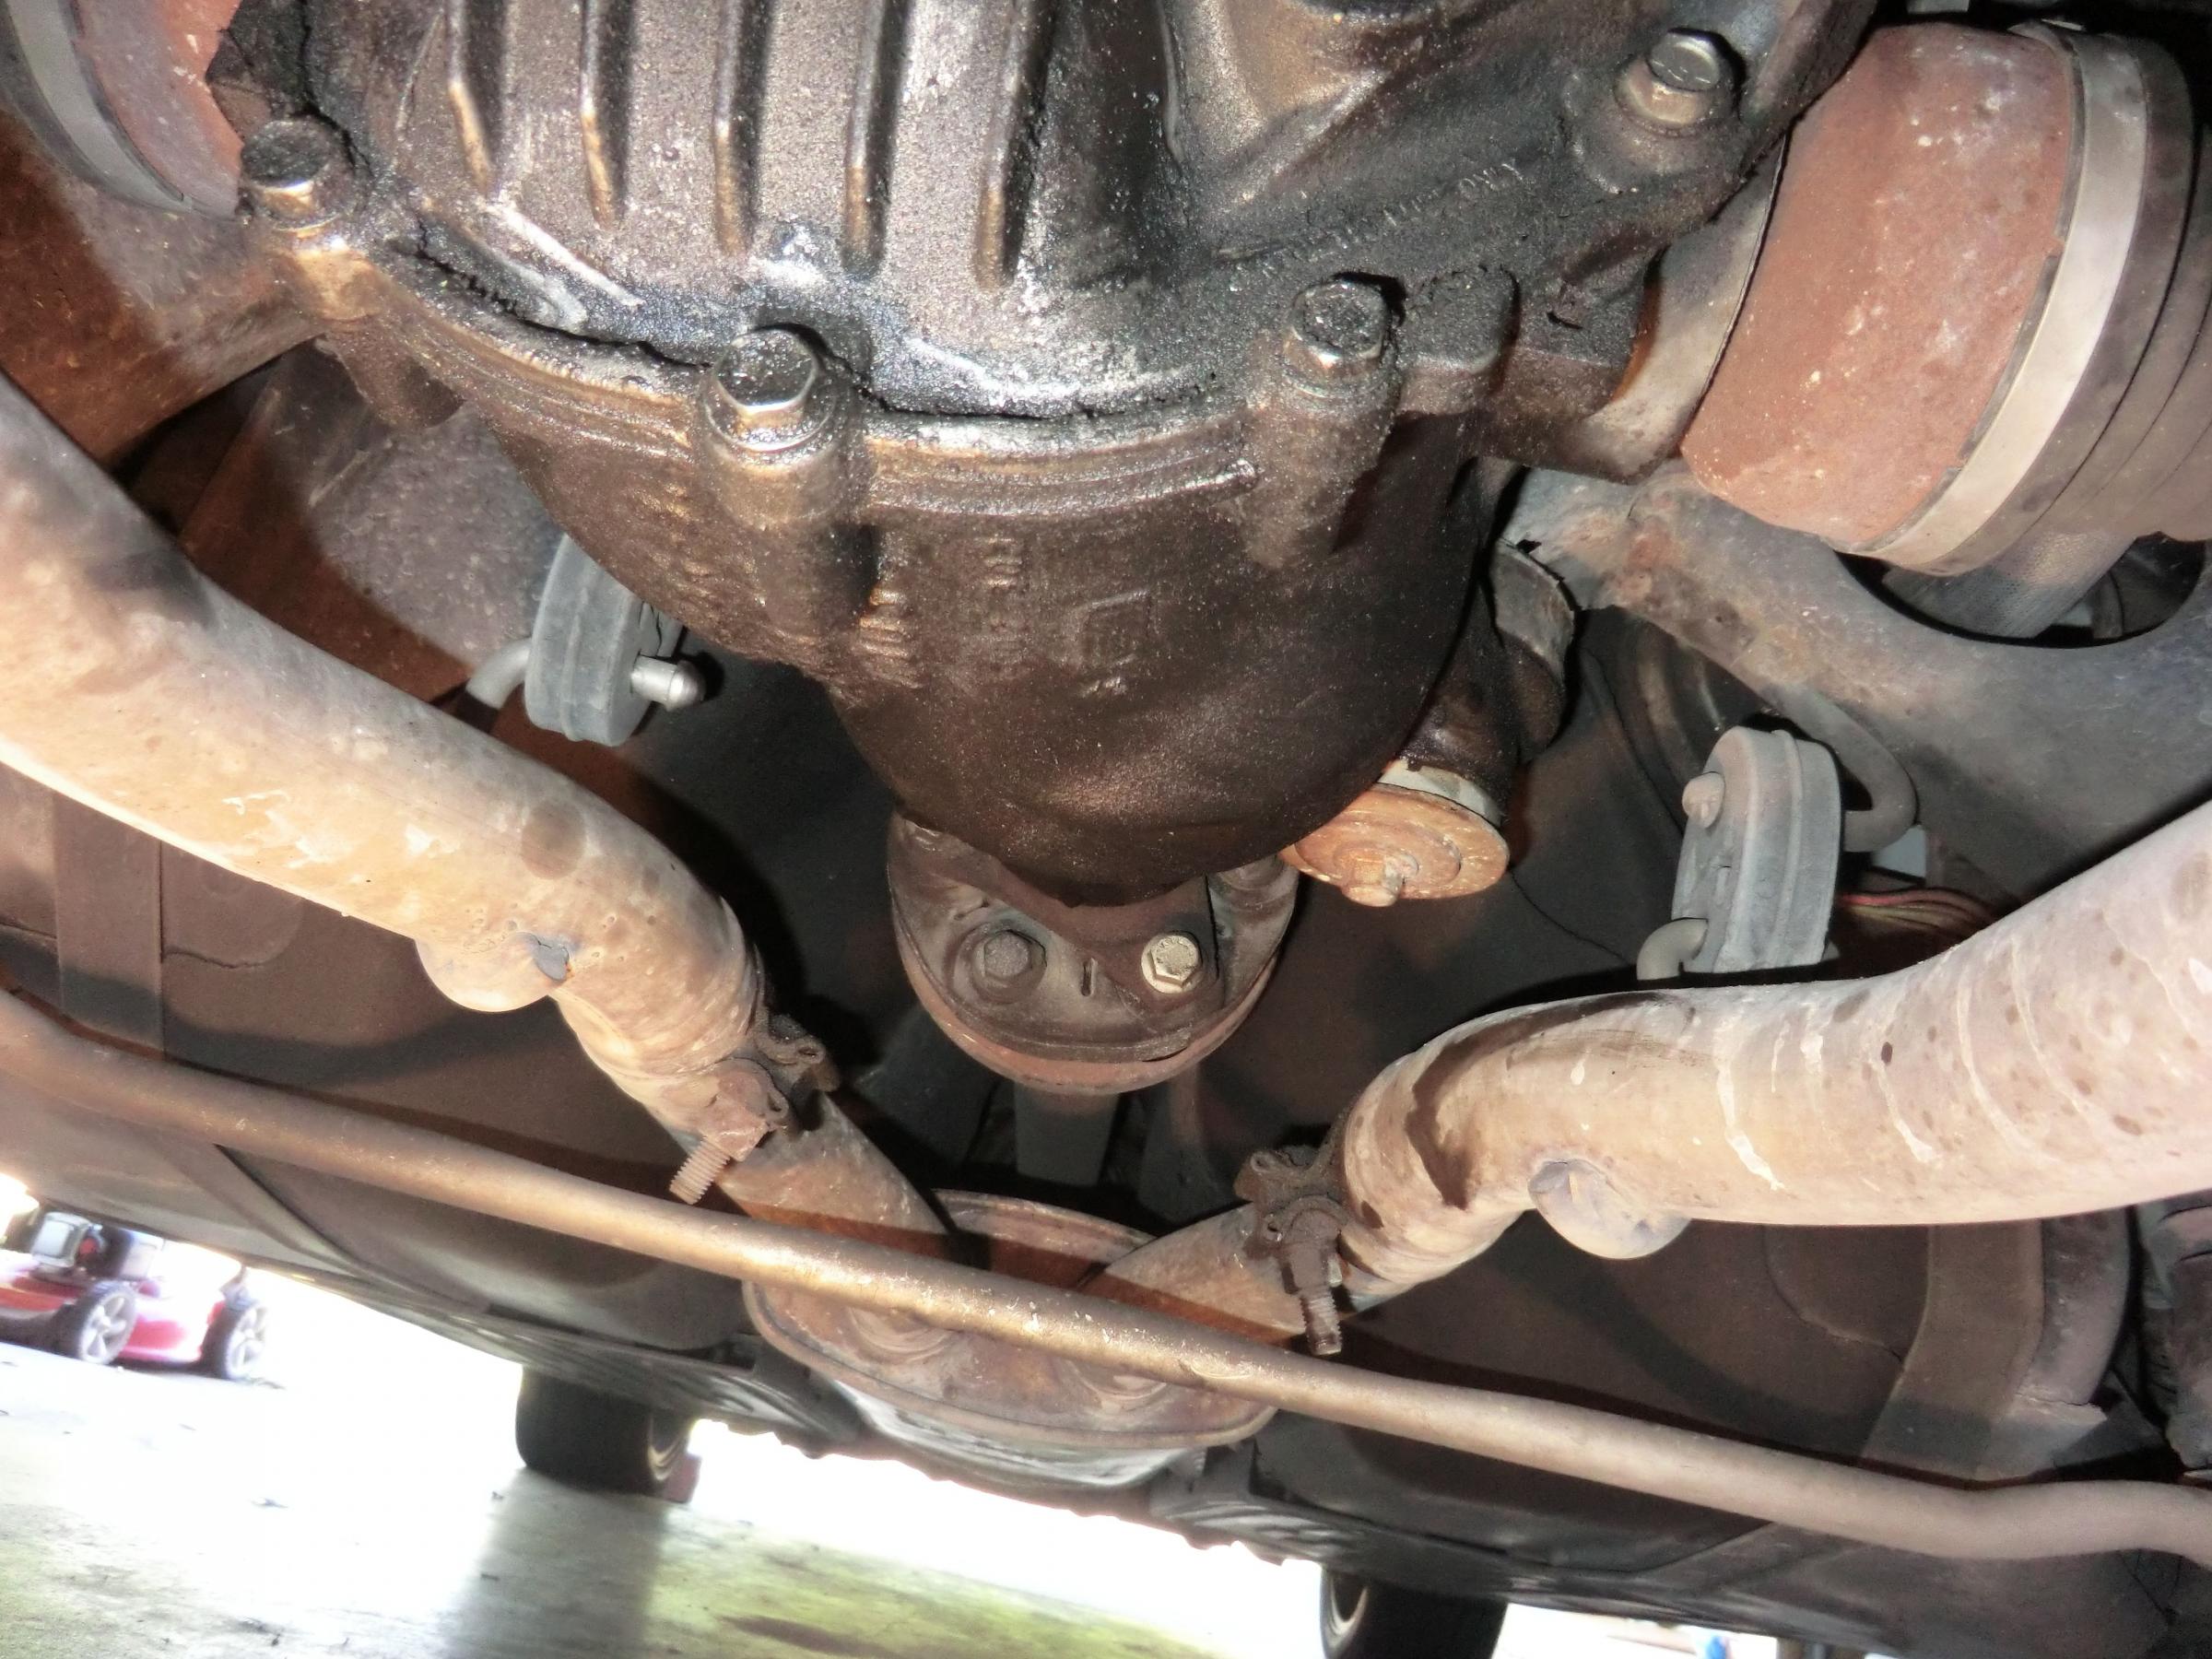
A differential leak is nothing to ignore. The differentialoil stopleak is the strongest formula to stop main seal timing cover seal cam seal crankshaft seal oil pan valve cover and all other oil leaks.
 Rear Diff Oil Leak Jaguar Forums Jaguar Enthusiasts Forum
A few drops nothing urgent.

Rear differential leaking oil. If there is a puddle of oil collecting under the car you probably have a leaking differential gasket. Depending on the size of the leak it may be okay to drive with a leaking axle seal but not for very long. You will also need a drain pan to collect the leaking oil in case you open up the system.
This means that your differential oil is running dangerously low and causing the gears to grind against each. The easiest and hassle-free option to fix the issue. If the differential gasket fails the fluid inside of the differential housing may leak out and leave puddles or drips of gear oil on the floor underneath the vehicle.
The rear differential cover is typically silicone or rubber and can deteriorate. At the front of the differential is a yoke that attaches to the driveshaft. This will sound like a whining or a howling noise.
You must also check underneath the rear of the car between the two tires where the rear differential is located. Get a can of rear differential fluid in case you have to replace it along with an oil filling pump. Different oil leak repairs include.
Do you have a Toyota vehicle and are experiencing leakage from the rear axle wheel seals even after replacement. BlueDevil Oil Stop Leak is more concentrated and is the universal application that will work for various leaks such as oil pan leaks rear main leaks valve cover gasket leaks etc. The purpose of the axle seal is to keep transmission fluid from leaking.
Differential Oil Stop Leak. Jaguar under factory warranty replaced the rear assembly including the cross shafts. If it was from the trany it would have had oil on the drive shaft and under the car all the way back to the rear and dripped under the trans.
Honda 08200-9003 oil is created for the differentials of Honda and Acura wheel-drive vehicles equipped with the VTM-4 system. In some cases you wont hear any noises at all but there may be a noticeable leak. Car was towed to dealer and after checking issues the seal on the output shaft of the differential was leaking With inspection determined that flange holding bearing was loose and has causing issues.
Dont begin this car repair job until you are equipped with the requisite tools. There are several high-quality leak sealer products in the market. An axle seal is the part of the vehicle that connects the axle to the rear differential or the transmission.
Watch this video for important information. Differential fluid often looks just like motor oil. The answer depends on how much is leaking.
Rear Differential Leak Sealer. Once again youll have to put your eyes on the leak to determine its origin. Its distinguishable feature is a super resistance to the shifts of temperature.
For a rear differential leak we recommend using the BlueDevil Oil Stop Leak. This is the only fluid suitable for pouring into the rear-wheel-drive gearbox of VTM-4 vehicles. My rear differential is leaking gear oil from underneath the flange on the breather valve.
It will repair the leak and restore the seal to the previous condition while you drive. Usually if you have a leak at the rear of your vehicle and its rear-wheel drive or all-wheel drive it means your differential is leaking. Dumping fluid stop driving it as not only is it dangerous if it gets under your tires but if the diff runs dry then that thing will be toast very quick and the diff is VERY expensive to replace.
Some people have mentioned topping it off. Working Mechanism of a Differential. Usually leaks large enough to leave traces on the ground will also have noticeable accumulation of oil on the underside of the differential that should be clearly visible as well.
Instead of spending your time finding the leak source add some sealer to the differential fluid through the oil fill plug. Whereas the Rear Main Sealer is specifically formulated for only a leaking rear main seal. The gear oil is not over filled.
Sounds may also emanate from the gears adjacent to the offending differential. Rear differential gasket replacement. The rear under normal conditions will leak at the cover pinion seal or the axle seals which will show up at the ends of the axles and on the wheels.
The Differential Oil Stop Leak should be able to handle its purpose and duties with ease. If youve been hearing a whirring or clicking noise coming from the back end of your car theres a good chance that there will be a rear differential repair in your near future. I swapped out the old valve for a new one.
Rear differential pinion seal. I have installed the new one with thread sealant and a nylon washer to try and form a seal. Differential oil usually has a distinctive smell.
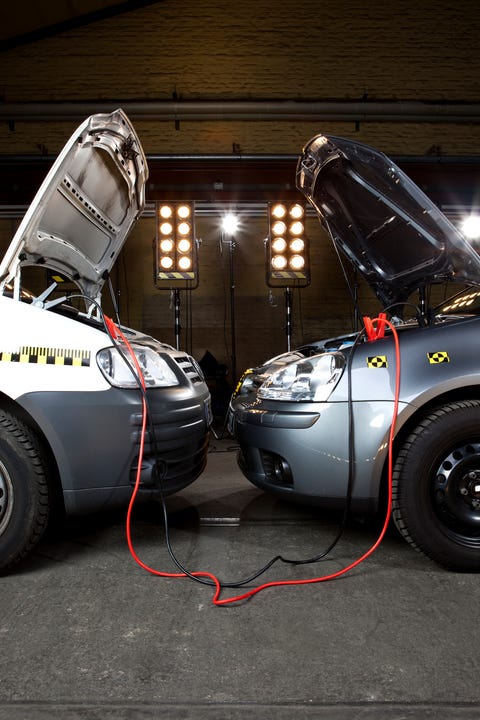
Then turn off both cars and open the hoods. How to Jump-Start a Car.
 How To Jump Start A Car Step By Step Guide To Using Jumper Cables
How to jump start a car is usually pretty simple but its serious business and you have to do it right to do it safely.

Jumping a car with cables. First ask the other driver to pull up next to your car so the jumper cables will reach each cars battery. With the backing of the most trusted name in the automotive industry AAA you know when you accessorize your vehicle with a AAA all in one auto kit that includes first aid components as well as jumper cables and other road safety essentials that you are receiving only the finest components. In any electrical system electrical energy flows from the negative terminal of a battery to the positive through a system of wires powering something - in this case the vehicles starter - along the way.
Carrying a set of jumper cables can help you help a fellow motoristor the other way around. Youll need another car and a pair of jumper cables or a portable jump starter. The cables get connected the donor car starts and sends some charge.
It usually involves a jumpstart the practice of using another cars battery along with a set of clamp-on jumper cables to get your car started. Make sure both cars are turned off. Connect the other red positive cable to the positive terminal of the good battery.
In order to properly jump-start a car you will need to create a circuit that carries the current from the live battery over to the dead one. But if youre buying new cables look for ones that are 4 to 6 gauge in size and at least 20 feet in length. Connect one end of the red positive jumper cable to the red positive post of the dead car.
You can find cables in auto parts stores at gas stations or just about anywhere you buy car parts. The vehicles shouldnt touch one another. Automotive batteries are designed to produce the high electrical current required to start the engine.
Find Jumper Cables Jump Leads Read and follow the Safety and Handling Information on this website and with the jumper cables. The jumper cables clamps are color coded in red and black as well so its easy to know what goes where as you get set for the jump-start. They recommended buying a small jumper unit that connects the 12v power outlets of the vehicles.
Its always a good idea to keep jumper cables with you. That is due to computerization starting the recipient car can be more of a reboot than a jump. Connect one end of the black negative jumper cable to the.
This only takes a few minutes to set up but youll want to carefully follow a few specific steps to stay safe. Its always a good idea to have jumper cables and an emergency kit or battery booster in your vehicle in case you have a problem. In order to do this successfully the cables should be connected in this exact order.
Posters stated that it was unnecessary to jump start or crank many modern cars. As long as you. Connect the Cables to the Battery Terminals Jeff.
Youll need a set of jumper cables and another vehicle with a charged battery. Almost all drivers know that a car with a dead battery can be started by jumping it from a car with a charged battery. This routine procedure can become dangerous if the jumper cables are connected improperly -- if.
The colors are important indicators of where to attach the cables. If your battery has died you may be able to use jumper cables to jump start it from some good Samaritans vehicle. Maybe you call the auto club or a friend who knows their way around cars or you may have a set of jumper cables in your trunk.
Booster cables can range from 1 gauge thickest wire to 12 gauge thinnest wire. Jumper Cables Any pair of jumper cables is better than not having any at all. Every year people are seriously injured while attempting to help another driver with a jump.
A set of jumper cables should have one red cable and one black. This process was described as hopping rather than jumping. Connect the red or positive clip on the jumper cables to the positive terminal on the dead.
There are different gauges of cables so be sure to consult a service manual to see if your vehicle has a specific gauge requirement. If you can safely use jumper cables on your vehicle make sure that the battery on the good Samaritans vehicle has at least as much voltage as your own. Park the car youll use for jump-starting next to the one with the dead battery positioned close enough so that the cables will reach.
If two people are available to jump-start a car one person can simply hold the ends of the jumper cables safely separated while the other person moves between the cars making the proper connections. Connect one end of the red positive jumper cable to the positive terminal on the stalled battery. The thicker the wire the faster the battery will be charged.
Its a good idea to keep a just-in-case of emergency stash in your car including jumper cables as well as a first aid kit flashlight and a spare tire at the very least. To Jump Start a Car With Cables Follow These Steps. To jump start a car youll need jumper cables and another driver whos willing to assist you.
CHEVROLET 1994 S10 PICKUP 43L V6 Transmission-Manual Manual Transmission Assembly. 1994 CHEVROLET S10 Transmissions.
Problem with your 1994 Chevrolet S10.
1994 chevy s10 transmission. Select the navigation view you prefer when narrowing your search. 4L60-E Automatic The L60-E four-speed electronically-controlled automatic dates to1982 and transmitted power from the engine not only for the S10 but also for the sixth generation Corvettes. For Chevy S10 94 Dahmer Powertrain T4L60E2294T2 Automatic Transmission Assembly Fits.
CHEVROLET S-10 T-5 FIVE SPEED GOOD TRANSMISSION ELECTRONIC SPEEDO WSHIFTER. Anyone else do this and have any recommendations on which. We carry a large inventory of Chevrolet S10 Pickup automatic transmissions.
We provide the right products at the right prices. 4TADSHD Only 1 Remaining EXACT POWERTRAIN. Automatic Transmission 4 Cyl 134 cid 22L Automatic Transmission 6 Cyl 262 cid 43L 4x2 Automatic Transmission 6 Cyl 262 cid 43L 4x4 engine VIN W 8th digit Automatic Transmission 6 Cyl 262 cid 43L 4x4 engine VIN Z 8th digit.
Shop millions of cars from over 21000 dealers and find the perfect car. It served trucks up to 8600 lbs. Our list of 17 known complaints reported by owners can help you fix your 1994 Chevrolet S10.
1994 CHEVROLET S10 Transmission Drivetrain. Manual Transmission 2WD 4-134 22L Fits 94-95 S10S15SONOMA 149494 Fits. CHEVROLET 1994 S10 PICKUP 43L V6 Transmission-Automatic Automatic Transmission Assembly.
Built to last your Chevy S-10 handles anything you throw at it. From 1994 the S10 used one automatic and three manual transmissions. This video will show you how to remove a transmission and transfer case from a mid 90s to early 2000s GMC Sonoma Chevy Blazer Chevy S-10 and Oldsmobile.
Our used S10 Pickup transmissions inventory changes daily as we dismantle more vehicles. No parts for vehicles in selected markets. Our list of 17 known complaints reported by owners can help you fix your 1994 Chevrolet S10.
1994 CHEVROLET S10 Results 1 - 25 of 1627 In-Store Pickup. ACDelco 14061685 - ACDelco Pilot Bearings and Bushings. 1994 Chevrolet S10 256962 Automatic Transmission 4-134 22L Fits 94 S10S15SONOMA 355814 Fits.
ZUMBROTA 40002397B 40002809 Remanufactured. No parts for vehicles in selected markets. Sometimes though the workload can lead to maintenance concerns like slipping gears which might mean you need Chevrolet S-10 automatic transmission parts from AutoZone for an upcoming repair.
1994 Chevy S10 Transmission in-stock with same-day shipping. The transmissions included automatic models 4L60 and 4L80 the Borg Warner T5 manual and New Venture manual models 3500 and 4500. Fuel Pump Replacement 572 - 737 in Wheeling IL.
These transmissions each require a different visual identification process however locating the identification tag attached. Hello all - I need to change my ATF 2002 s10 43l and Ive read about draining it through a cooler line as well as the pan in order to get all or most of the fluid out. SRT STAGE I 4L60E.
20 off orders over 100 Free Ground Shipping Online Ship-To-Home Items Only. 1994-1995 Chevy T5 Manual Transmission 5 SPEED Hot Rod S10 Truck World Class. 1993-1994 Chevrolet S10 Blazer 43L 4X4 1993-1994 Chevrolet S10 43L 4X4 1993-1994 GMC Sonoma 43L 4X4.
Guided Navigation Display Options. 999 Before any upgrades addons andor core charges. Filter Results 1994 CHEVROLET S10 Individual Parts.
A variety of transmissions were used on 1994 Chevrolet trucks. EXACT POWERTRAIN Remanufactured. We warranty our entire used S10 Pickup manual or automatic transmissions with a minimum 6-months to 2-years depending on the specific S10 Pickup transmission assembly.
Shop 1994 Chevy S10 Transmission and get Free Shipping on orders over 99 at Speedway Motors the Racing and Rodding Specialists. ACDelco 14061685 - ACDelco Pilot Bearings and Bushings. 1994 Chevrolet S10 25000 94 95 S10 BLAZER TRANSFER CASE WO OPT F46 DASH SWITCH ELEC SHIFT 199207 Fits.
There are 8 choices for the 1994 Chevrolet S10 Pickup Transmission Assembly. 4L60E 1993-1994 4X4 TRANSMISSION 57L 50L 43L quantity. Results 1 - 25 of 376 25 Records Per Page Default Sort.
Transmission Fluid Change 133 - 154 in Berryville VA. 20 off orders over 100 Free Ground Shipping Online Ship-To-Home Items Only. Pilot Bearing Roller Steel Cadillac Chevy Pontiac Each.
Automatic Transmission 4X4 43L Fits 2000 S10 BLAZER 721364 Fits. I am pretty inexperienced here but would like to do this.
Before you learn how to use radiator stop leak you need to find the source of the leak. Pour Stop Leak into a cool radiator.
 10 Best Radiator Stop Leaks Reviews Updated 2021 Thermo Gears
Once you have found the leak you should determine the best way to fix it.
How to stop a leaking radiator. Some components naturally wear out over time. Turn off your heating system and cut the water supply to your radiator. Run the engine up to operating temperature.
Use 12 bottle for four cylinder engines. Fixing Coolant Leaks The best way to fix a coolant leak is to track down the location of the leak and repair the old damaged or ineffective part. These include adding a bottle of cooling system sealer an egg black pepper or epoxy glue.
If your radiator is still leaking water after being repaired follow these steps. The ratio of water and antifreeze should be 5050. Wrap around 20 cm of PTFE tape around the area where the face of the olive crosses the joint.
There are a several ways to temporarily do this. ATP AT-205 Re-Seal Stops Leaks. Run the engine for approximately 20 minutes and fill to proper level.
In some cases the radiator can also be soldered or welded. With a variety of products available solving the problem to your leaking radiator. Put radiator stop leak in the coolant reservoir or radiator.
How to fix a leak in your car DIY with Scotty Kilmer. Remove the nut and the fitting and take the olive off the pipe and replace with a new one smearing with silicon sealant or winding it with PTFE tape before reconnecting. The grains of the pepper will migrate to the pinhole leak and plug it.
Buy a reliable radiator stop leak. Remove the radiator cap opening and directly pour the black pepper into the radiator. Because coolant systems are pressurized its important to wear safety glasses.
How fix car radiator leaks. Bars Leaks Liquid Aluminium Stop Leak. Allow the engine to cool.
If you choose to tighten up the brass insert body you could damage it further. Put on the appropriate safety gear. The liquid formula will make its way around the engine and fill any pinhole leaks holes and cracks in your radiator or cooling system to fix it permanently.
Wash the radiator with a hose. Locating the Leak 1. For example if you have a cracked hose replacing it is the most effective way to stop your leak.
If the valve is leaking from the valve body or the stem in the middle this means that the valve has failed and you should call a plumber since you will need a new valve. A leaking radiator may be hissing dripping or spraying coolant. The Best Radiator Stop Leak.
Drain your radiator to below the source of the leak Use a spanner to remove the nut from the leaking radiator pipe Take your PFTE tape and wrap it around where the face of the olive meets the joint. All you have to do is fetch your Miracle Seal and pour the sealant into the header tank of the heating system. How to use leak sealer.
Got your own plumbing or heating problem. Seal Your Radiator Leak. Drain the water out of your appliance to a point below the source of the leak.
One bottle treats 4 gallons. You may have to. Confirm the size of the leak.
If direct access to radiator is not available install in overflow reservoir tank. Use Miracle Seal to seal a leaking radiator pipe Using Miracle Seal is super simple which means you dont need to be a professional plumber or tradesman to get the hang of it. How to Use Radiator Stop Leak Prepare Your Work Area.
Pour approximately 1 to 2 teaspoons of coarse ground pepper into the radiator opening and replace the cap. Do not pour it into the back up reservoir. Finding the Source of a Radiator Leak.
With the engine running and at operating temperature carefully remove the radiator cap. To do this you have to drain the heating system of water and then loosen the nut between the leaking pipe and the radiator. How to find and fix leaks in your car.
The very first sign of a leaking radiator is an overheated engine that often forms a. Untighten the joint nut with an adjustable spanner and try to detach the leaking pipe. Jan shows how to fix that radiator valve in 2 minutes.
Your radiator has the important task of helping to maintain the operating temperature of. Bars Leaks Liquid Aluminium Stop Leak is one of the most well known and loved coolant. Here is a step by step guide on how to go about it.
Take some black pepper about one tablespoon and pour it into the radiator. If youre looking for a safe and fast car radiator sealant.
We have 66 2004 Nissan Altima vehicles for sale that are reported accident free 14 1-Owner cars and 104 personal use cars. 2004 Nissan Altima 5 out of 5 stars 5 5 product ratings - 2002-2008 Nissan Altima Maxima 35L V6 Oil Cooler Hose OEM NEW 21306-8J115.
 How To Replace Engine Oil 02 06 Nissan Altima Youtube
Nissan Altima Automatic Transmission USA Built 2004 Full Synthetic ATF VI Automatic Transmission Fluid 1 Liter by Motul USA.
Oil for 2004 nissan altima. The Altima offers everything buyers want in a reasonably priced sedan particularly those who dont always travel alone. Here you will find Nissan oil change oil filters replacement Nissan oil change service you can have at your local Nissan dealership as part of the Nissan USA service maintenance site that offers all the service maintenance your Nissan needs from oil change to regular maintenance or warranty repairs our Nissan-trained technicians have it covered. If you own a Nissan Maxima with 200000 miles or more on the original engine you may wonder what weight of oil is best to use.
2004 Nissan Datsun Altima Oil Filter. A Nissan Altima Transmission Fluid Change costs between 168 and 183 on average. Your Altima needs motor oil to protect against rust corrosion and the pre-mature wear of critical engine components so make sure to address low levels early on.
Advance Auto Parts has 15 different Oil Pressure Switches and Senders for your vehicle ready for shipping or in-store pick up. Showing 1-15 of 25 results. Shop AutoZone for 2004 Nissan Datsun Altima Oil Filter.
70 - 89. You may have heard that the wear on the engine means that you should transition to an oil with heavier viscosity but other opinions hold firm that. 35 - 44.
Oil Pressure Sensor Replacement. Nissan has recommendations as to whether conventional or synthetic oil is the best motor oil for your 2004 Altima. The average price of a 2004 Nissan Altima oil change can vary depending on location.
2004 Nissan Altima OVERVIEW The Nissan Altima boasts a bigger interior than the Toyota Camry Honda Accord and most other mid-size sedans. The best part is our Nissan Altima Oil Pressure Switches and Senders products start from as little as 1099. Get a free detailed estimate for a repair in your area.
When it comes to your Nissan Altima you want parts and products from only trusted brands. 2002-2008 Nissan Altima Maxima 35L V6 Oil Cooler Hose OEM NEW 21306-8J115 Fits. Its roomy comfortable and functional.
Nissan Altima 2004 High Mileage SAE 10W-40 Semi-Synthetic Motor Oil 1 Quart by Champion Brands. Every used car for sale comes with a free CARFAX Report. Expert opinions vary but 20W-50 or 10W-30 are frequently mentioned.
Nissan Altima with 65 Series Compressor with 5 oz Oil Capacity 2004 PAG-46 R134a Synthetic Refrigerant Oil 8 oz by gpd. Your order may be eligible for Ship to Home and shipping is free on all online orders of 3500. Nissan Altima 2004 High Mileage SAE 10W-40 Semi-Synthetic Motor Oil 1 Quart by Champion Brands.
Shop 2004 Nissan Altima Oil Filter. 2004 Nissan Datsun Altima Oil Filter. 1-14 of 14 Results.
Find the best used 2004 Nissan Altima near you. Air Bag Control Module Replacement. We currently carry 17 Oil Filter products to choose from for your 2004 Nissan Altima and our inventory prices range from as little as 499 up to 1599.
Buy online and pick up in store or get fast free delivery on qualified orders. Order Motor Oil - Vehicle Specific for your 2004 Nissan Altima and pick it up in storemake your purchase find a store near you and get directions. 1-14 of 14 Results.
89 - 97.
GLISTON 5pcs Auto Trim Removal Tool Car Pry Tool Kit Door Panel Clip Removal Set for Vehicle. 43 out of 5 stars 46.
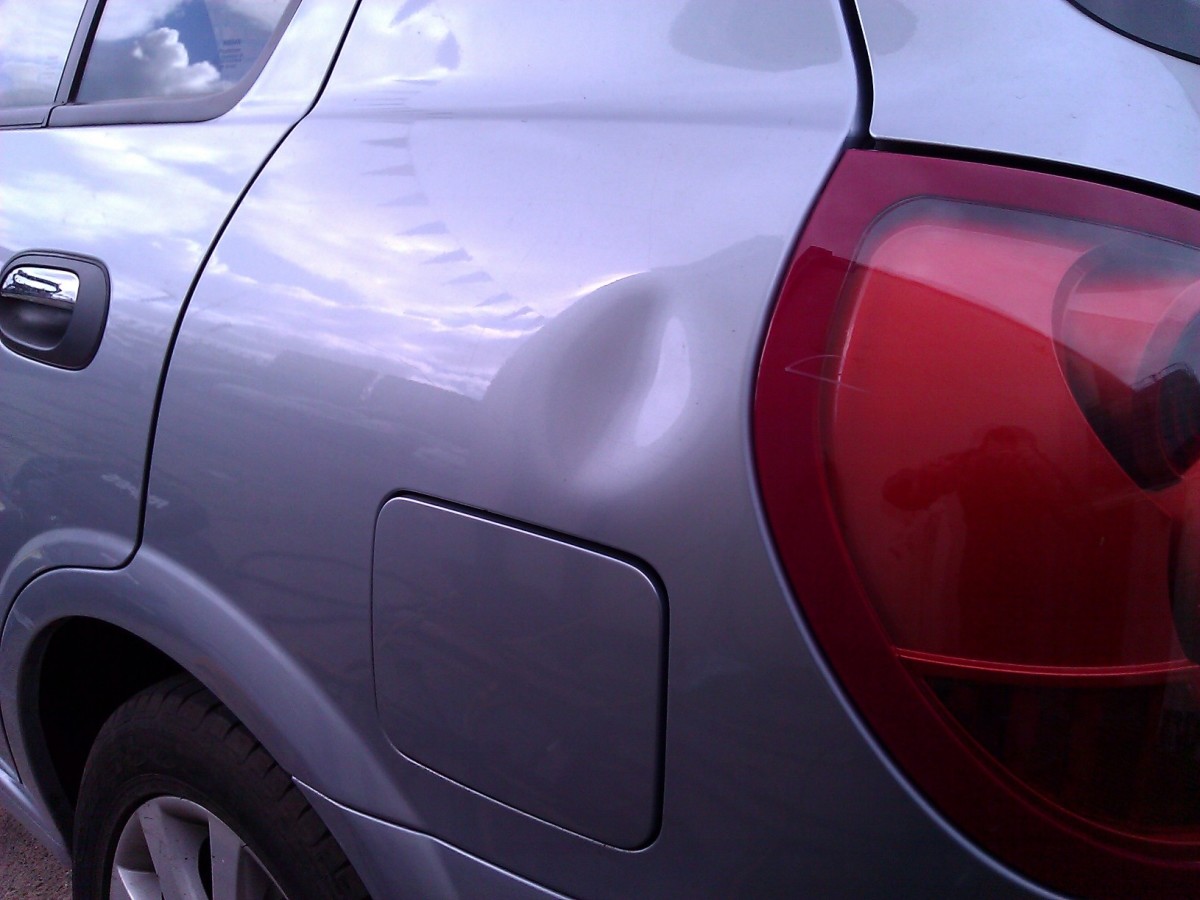 Easy Diy Ways To Take Dents Out Of Your Car Axleaddict A Community Of Car Lovers Enthusiasts And Mechanics Sharing Our Auto Advice
This will work wonders if you want to sort out a bulging spot on a plastic or metal surface such as a car bumper.
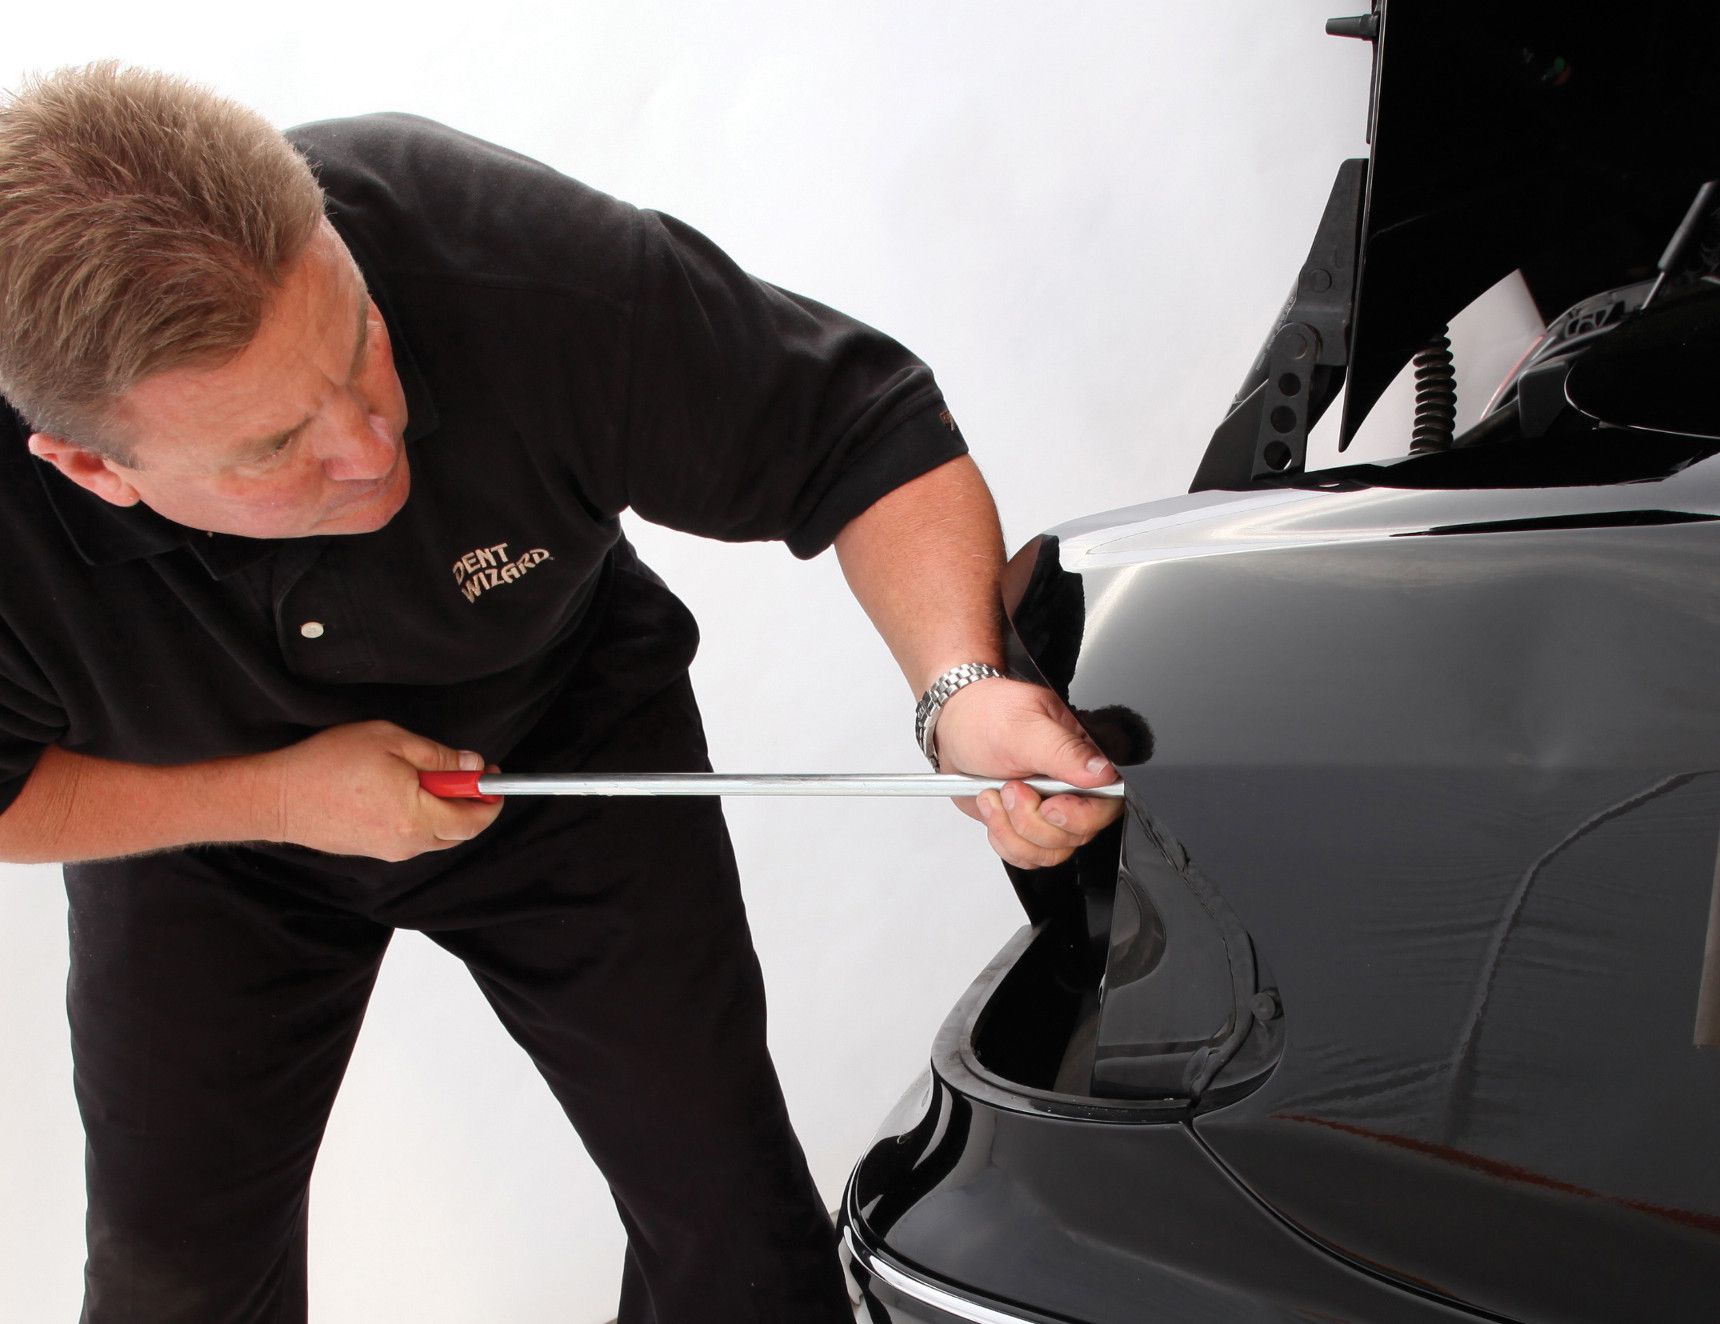
Pulling dents from cars. You then clamp a dent puller to the stud and slide the weight away from the dent which then pulls the metal outward. The age of the paint or car is not an issue. Get it as soon as Wed Feb 10.
Car dent repair with suction and hot water. Before you try using boiling water and a plunger to rem. Clean the body of the car so that it is free from grease and dirt.
Start off by heating the car dent with the hair dryer at its highest temperature which will expand the plastic of the car. Redwood City CA Redwood City CA. FREE Shipping on orders over 25 shipped by Amazon.
Attach the tab to the dent but dont press too hard the glue tab should be touching only the glue not the panel. Gliston Auto Dent Puller Kit - Adjustable Golden Dent Remover Tools Paintless Dent Repair Kit Dent Lifter Puller for Car Large Small Ding Hail Dent Removal 42 out of 5 stars 1388 4499 44. Car dent removal and repair without having to repaint DIY with Scotty Kilmer.
As soon as its hot enough grab the can of compressed air turn it upside down and begin spraying that same area. In this video I will show you whether its possible to remove dents using boiling water and a plunger. ABN Dent Puller Suction Cup 2in Small Dents Remover for Pulling Automotive Car Hail and Door Ding Damage.
TESTING THE CHEAPEST DENT PULLER ON AMAZON. Get it as soon as Mon Feb 8. 3 You may be able to pull out small dents in your car using a hot glue gun and some wooden dowels with a DIY version of whats known as a glue pull In professional shops a glue pull involves.
PDR Auto Paintless Dent Repair Kits Car Dent Puller Kit with Bridge Dent Puller Kit Full Set Dent Remover Tools for Door Dings Hail Damages and All Kinds of Car Dents. How to remove a car dent. As we touched on in the product list suction is best suited to big dents so say if your door got pushed in or your roof or bonnet.
500 coupon applied at checkout Save 500 with coupon. 3 Put a bit of soapy water on the rim of the plunger not too much. One of the methods of paintless dent repair is the technique of glue pulling dents out of cars.
Heat the glue gun and apply a pea-sized blob to your selected pulling tab. 29 out of 5 stars 2222. Finally make the pull.
How to fix a car dent. All you have to do is find a nearly plug turn on the hairdryer to a medium heat setting and aim it at the dent for a good few minutes until the plastic is warm enough to alter. Fix a dent quick cheap and easy.
This will leave your car or truck cover without any paint chips as it is a safe way to pull out a dent. Watch as the dent slowly comes out. You can watch several of the videos showing how we use Glue Pulling to Remove Dents.
You will be able to get maximum force over the dent and pull it out over several areas of impact. Dent repair on car. How to Remove Car Dents Fast DIY with Scotty Kilmer.
When the glue has dried begin pulling on the dowels to pop the dent out of your vehicle. Blow away your troubles by using a hairdryer to remove the car dent. Since the cold air will cause the plastic to contract the dent will pop out.
Pulling the trigger to long may burn a hole right through the metal. Suction Stop giggling you can indeed use suction to pull a dent from your car. We can remove dents from very old vehicles especially with original paint which is the most resilient.
Apply the dowels in evenly spaced areas over the dent. How to fix dents in your car without. This process uses many different kinds of special glue tabs hot glue and pulling devices to take out dents from the metal panels of a car.
The hair dryer should be set to medium and should be held between 5 and 7 inches 127 and 1778 cm away from the cars surface. Be careful not to pull to hard on the hammer as this can stretch out the the metal and shrinking it back into place can be very tough. Turn on the hair dryer and use it to blow hot air over the dent and the surrounding area for one to two consecutive minutes.
Suction wont work on small dents because you need clean surface area to mount the suction cups. Manelord Auto Body Repair Tool Kit Car Dent Puller with Double Pole Bridge Dent Puller Glue Puller. This will help the plunger create suction against the clean car body.
Only 3 left in stock - order soon. Manelord Glue Gun - 100W Hot Glue Gun with 10Pcs High Adhesion Hot Glue Sticks for Car. Apply heat to the dented panel.
Body Repair Dent Removal Tools. Next attach the pulling fixture to the tab make sure the feet are flush to the panel otherwise it could create more dents. Glue pulling skills at master level.
Once the solution has had time to sit and work its magic use a clean towel or paper towel to absorb both the coffee and cleaning solution. Using a clean white cloth sponge the.
 Removing Coffee Stains From Carpet Tips Home Remedies
To remove carpet stains.

Best way to remove coffee stains from carpet. Dampen the coffee stain with a little bit of water. You have the best chance of completely eliminating the stain if you move fast. You can use lemon juice vinegar and dish soap or club soda.
Rinse thoroughly with clean hot water. Use a white cloth to blot the coffee moving from the outside to the middle of the stain to prevent the spill from spreading. The object here is wet and loosen up some of the coffee stain.
Apply the solution to a clean sponge. With a soft bristle brush sweep up the residue and vacuum to pick up the baking soda. Then mix one tablespoon of liquid dish soap one tablespoon of white vinegar and two cups of warm water.
Take a clean and white cloth to blot the coffee stain as much as you can. If there is still a stain present then repeat the above steps. Because coffee stain is organic it best responds to organic cleaners.
Just like you would with a wet coffee stain use a clean cloth to blot the wet area to pull up any loosened coffee. Make sure you dont rub the carpet as this could get the liquid trapped in the fibers. Allow the area to dry.
Dab the liquid cleaning solution onto the stain using a sponge or light-colored towel. Next blot the area dry with a clean dry cloth or paper towel. If its already dry you want to rewet the area with clean warm water.
To rid your carpet of foul smells first blot any strongly affected spots with a damp cloth. Removing Fresh Coffee Stains Start removing coffee stains from the outside of the stain and blot it gently using a clean white cloth or a paper towel. Combine the baking soda and water to get the coffee stains out stirring well to form a thick paste.
Allow the solution to sit on the stain for 5-10 minutes. Make sure that you consistently switch to a cleaner part of the cloth if the other parts already have stains on it. Spilling it on your carpet is sure to give you a boost of adrenaline but dont worry there are several methods for removing coffee stains from carpet.
To get coffee stains out combine the baking soda and water stirring well to form a thick paste. How to Get Coffee Stains Out of Carpet Lightly wet the stain with warm water to loosen the dried coffee. Step 2 You can then use a little bit of cold water to spritz on top of the stain.
Simply blot the spot Dry working from the outside in. Carpet Blot up as much of the coffee as you can. The water can help release some of the dried coffee.
These are the usually the best at breaking down protein-based stains and will prevent unpleasant odors in the carpet. The stain should then transfer from the carpet onto the cloth. Then blot the area with a dry white cloth starting at the edges of the stain and moving inward to prevent the color from seeping to surrounding fibers.
Alberto Navarrete cleaning expert and general manager of Emilys Maids recommends vinegar to anyone wondering how to remove coffee stains. If you find that you have to wait to clean the coffee stain from your carpet this method can remove those old dried or set coffee stains from your carpet. Use the steam and run the iron over the damp cloth.
Use a clean damp cloth with warm water to further blot clean the area and then blot it dry with paper towels or a microfiber cloth. Work towards the centre of the stain and keep blotting it using clean sections of the cloth or with fresh paper towels. Vinegar works well because the acid in it degrades the.
If youve spilled coffee with cream you may need to use an enzymatic carpet cleaner to break down the protein in the stain. Try using a pet carpet stain remover. Make sure you do not use a scrubbing motion as this damages the carpet.
For fresh coffee stains the first step is to soak up as much of the liquid as possible by blotting. When youre wondering how to get coffee stains out of carpet theres nothing a little lemon juice cant do in a pinch you can also use one-third cup white distilled vinegar to two-thirds cup water. Moisten the area with the paste and massage the area to cover as much of the carpet fibers as possible.
Dont soak the sponge but get it damp enough to have an effect when applied to the stain. Now give the rug a healthy sprinkle of. Step 3 Use a clean cloth to blot up the stain.
2000 Chevrolet Cavalier brakes problems with 53 complaints from Cavalier owners. The worst complaints are electrical engine and fuel system problems.
 Pin By Therunforrace On Vehicle 1900 2000 Chevy Aftermarket Parts Cavalier
2001 Chevrolet Cavalier problems 17 View all.
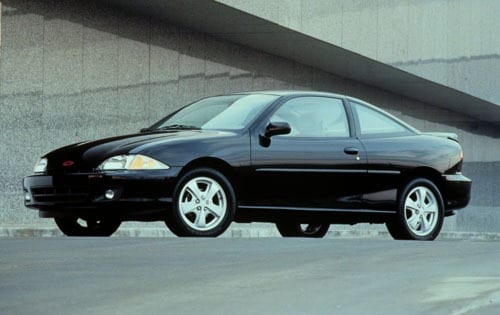
2000 chevy cavalier problems. 2002 Chevrolet Cavalier problems 18 View all. 2003 Chevrolet Cavalier problems 15 View all. The worst complaints are engine turns over but will not start check engine light is on and stalls while driving.
The number one most common problem is related to the vehicles electrical system with 70 problems. Get 2000 Chevrolet Cavalier values consumer reviews safety ratings and find cars for sale near you. 2000 Chevy Cavalier Engine will not turn overlost power.
2000 Chevy Cavalier Engine Cooling Problem. 2000 Chevrolet Cavalier Reviews. 2000 Chevrolet Cavalier problems 18 View all.
1993 Chevrolet Cavalier problems 16. When inserting the key into the ignition the vehicle failed to start. The 2000 Chevrolet Cavalier has 523 problems defects reported by Cavalier owners.
The contact owns a 2000 Chevrolet Cavalier. It Had Been A Year Or So. See good deals great deals and more on Used 2000 Chevrolet Cavalier.
Read 52 candid owner reviews for the 2000 Chevrolet Cavalier. 1992 Chevrolet Cavalier problems 17 View all. I have had my 2000 cavalier Z24 for 6 years now and I have not had any major problems with it other than the air conditioning it stopped working the same year I bought it.
2000 Chevrolet Cavalier Base The car is old it has a lot of cosmetic issues. The headlights horn door locks interior lights still work. Went to start car and lost all power to starter radio turn signals heater etc.
My 2000 Chev Cavalier gave me problems. Save money on one of 20 used 2000 Chevrolet Cavaliers near you. Search from 6 Used Chevrolet Cavalier cars for sale including a 2000 Chevrolet Cavalier Coupe a 2000 Chevrolet Cavalier Sedan and a 2000 Chevrolet Cavalier Z24 Coupe.
Problem with your 2000 Chevrolet Cavalier. Two years later the failure reoccurred. The worst complaints are brakes shudder loss of brake pressure.
Find your perfect car with Edmunds expert reviews car comparisons and pricing tools. The contact stated that the failure occurred intermittently. The second most common problem is related to the vehicles engine and engine cooling 45 problems.
After seventy miles per hour it shakes feeling like it might fall apart if I go too fast. Other than that it still runs decent. I Have A 2000 Cavalier 22 And Yesterday I Flushed The Radiator And Block Of All Its Coolant Fluids.
Our list of 18 known complaints reported by owners can help you fix your 2000 Chevrolet Cavalier. Get the real truth from owners like you. It doesnt do well idling when its hot.
Learn more about the 2000 Chevrolet Cavalier. Car Will Not Start problem 1. Recall 04v036000 repairs were performed on July 5 2004.
327 problems have been reported for the 2000 Chevrolet Cavalier. 1991 Chevrolet Cavalier problems 19 View all. But other than that its a fantastic reliable car that is great on fuel.
2000 Chevrolet Cavalier cooling system problems with 5 complaints from Cavalier owners. The following chart shows the 24 most common problems for 2000 Chevrolet Cavalier. 2000 Chevrolet Cavalier AC heater problems with 9 complaints from Cavalier owners.
2000 Chevrolet Cavalier engine problems with 80 complaints from Cavalier owners. It sounds like it may have a bad wheel bearing. Replaced the battery and checked all connections.
The worst complaints are engine and engine coolingcooling system engine and engine coolingcooling system. Its been pretty reliable for the most part. The worst complaints are blower fan doesnt work on all settings ac does not work and heater not working.
The average price of a 2001 Honda Civic check engine light can vary depending on location. He is an ASE Certified Master Technician and has bruised knuckles to prove it.
 How To Read Codes From Your Check Engine Light For Older Cars 3 Steps With Pictures Instructables
Generally there is a check engine oil light that comes on if there is a problem with the oil.
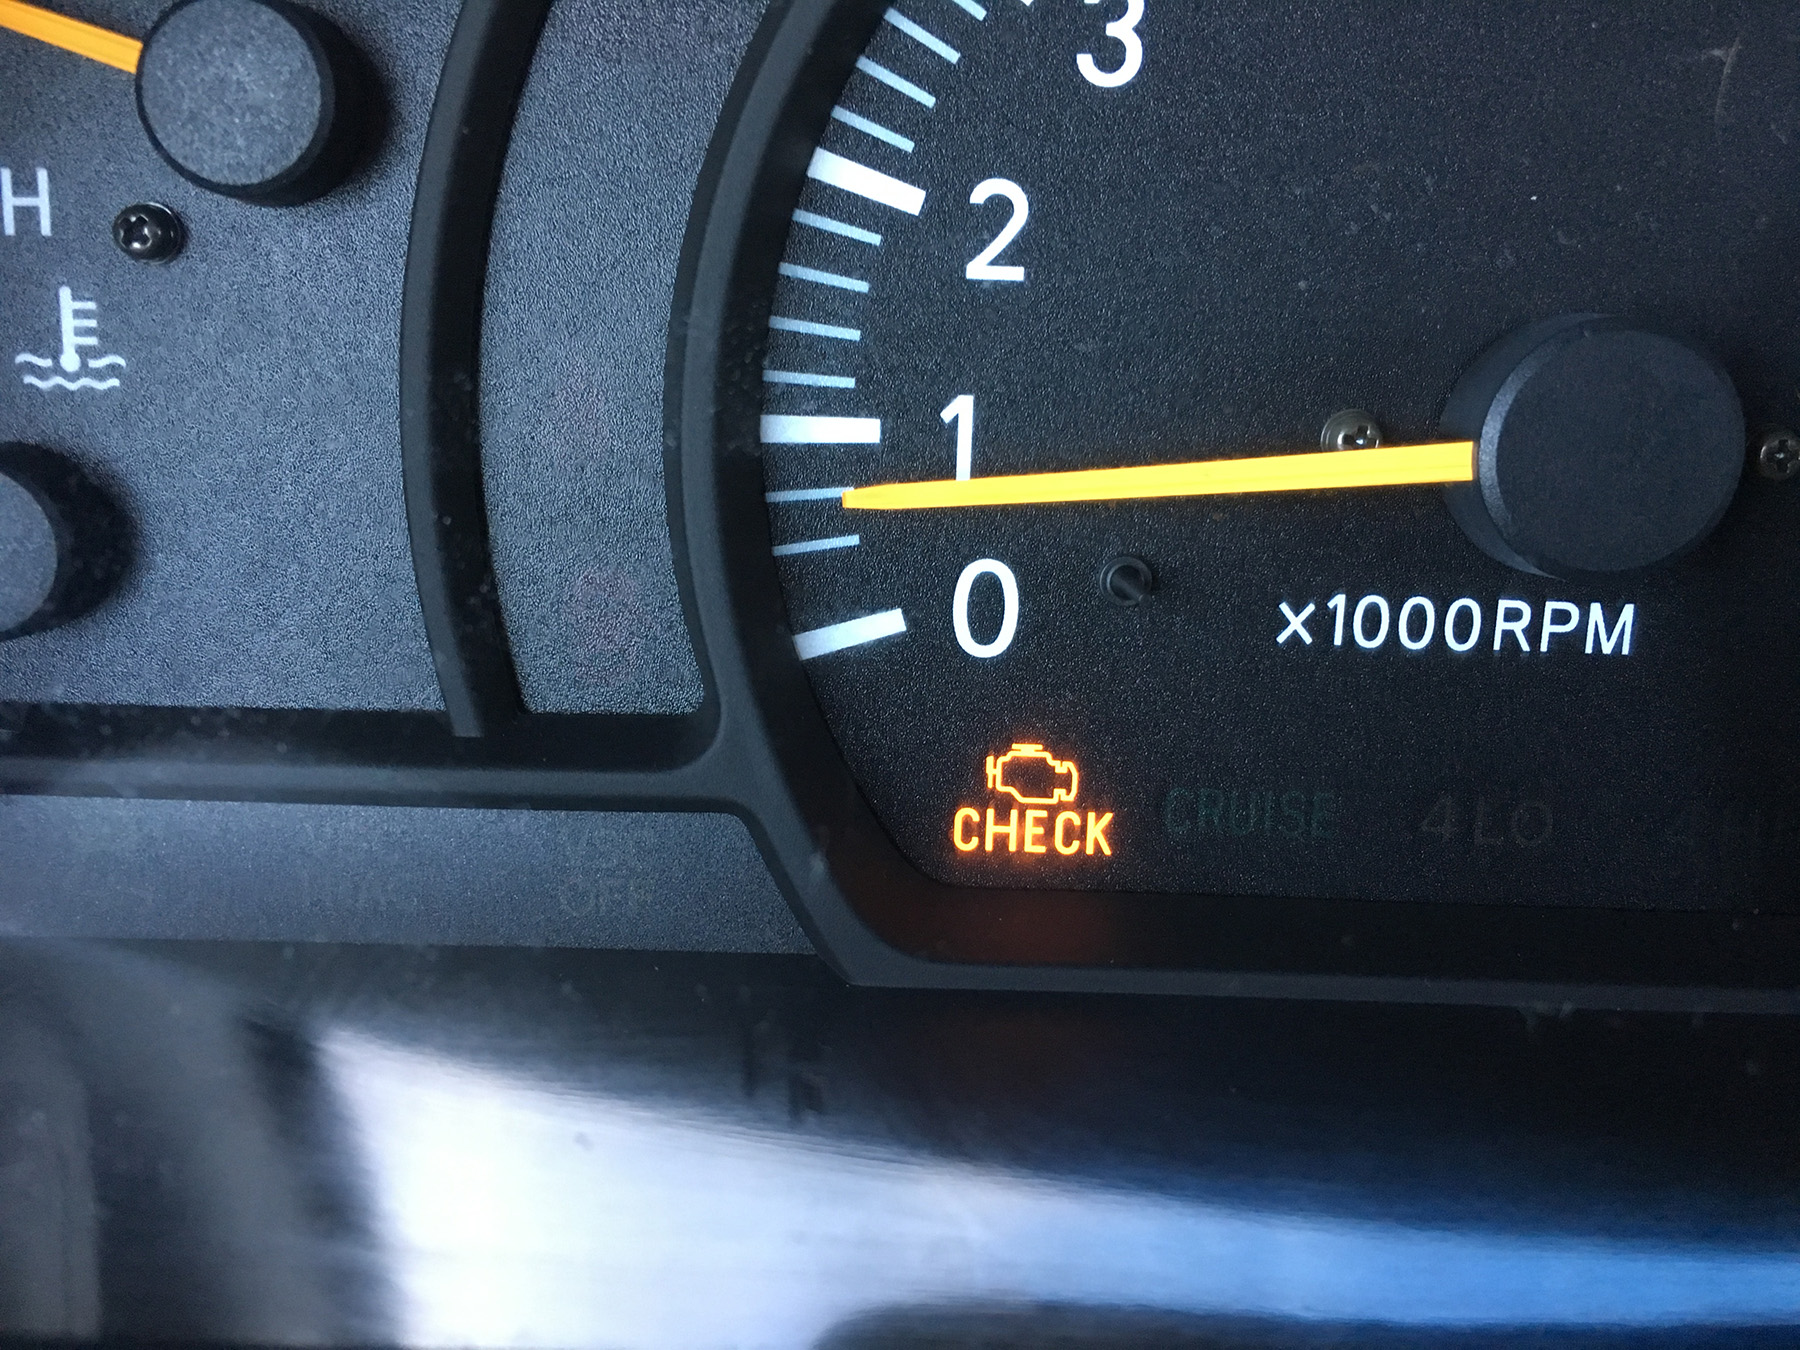
2001 civic check engine light. Continue driving with caution if you dont notice any performance issue. A check engine light can indicate a broad spectrum of problems with your 2004 Honda Civic. Average repair cost is 380 at 129800 miles.
Free Check Engine Light Testing. I had the car at the dealership a few weeks ago for a normal oil change and they did not see any problems. You should get the check engine light checked.
The contact owns a 2001 Honda Civic. 2001 Honda Civic EX mileage 120000. If your Honda check engine light stays on after you start the engine it means the On-Board Diagnostic OBD system has detected a problem with the engine transmission or the emission system.
Any help siggestions for the cause of the check engine light woul d be appreciated. Your timing chain could have jumped. Never ignore a warning light.
In some cases you need to pull over immediately to prevent damage while in others you merely need to tighten you gas cap next time you stop in order to reset the service engine soon light. The gages all seem normal and the car does not look to be overheating. The 2001 Honda Civic has 7 problems reported for engine light on.
Car is working fine otherwise. Here are the 10 most common issues that trigger it. You dont need to take your car to a mechanic and pay a diagnostic fee for your check engine light CEL or Malfunction Indicator Light MIL or even buy an.
A check engine light can indicate a broad spectrum of problems with your 2001 Honda Civic. Hi there i hav a 2000n honda civic lx 16lt the engine is runin with hig idle and the check engine light is on the transmission it doenst change the gear i got 2 code from the obd2 p1456p1106 read more. If you have VVT it may be having issues.
It said vacuum in tank cannot pull. One several months ago and then also just recently. If you look in your owners manual it will give suggestions on when to do certain checks.
My check engine light has come on two separate times now. However the check engine light also appears when the fuel tank cap is loose or a change in humidity has occurred. After a certain amount of time or a certain number of miles it comes on.
The PCM creates a code indicating what part or system is malfuntioning electrical system oxygen sensors and so on. Flashing Check Engine Light- Honda Civic While a majority of the time the flashing check engine light is going to be caused by a misfire related to your Civics ignition system or fuel system as stated above there are other issues that can cause it. The check engine light in your Honda offers important diagnostic information which will alert you of a serious problem like a bad catalytic converter.
When he depressed the accelerator pedal the vehicle failed to maintain speed and the transmission failed. This onboard computer runs your car so that it has optimum fuel economy and low emissions. However this time its been on all week.
The check engine light comes on automatically. It has done this in the past but has always reset itself after 3-4 drives. Your Check Engine light comes on when your cars onboard computer or PCM Powertrain Control Module records some kind of problem.
I have a 2001 Honda Civic and the check engine light has come on and stays on. I drive a 2001 manual Honda Civic with 170k miles. The orange check engine light is a cars way of telling you something is wrong.
This article applies to the Honda Civic 1992-2000 and Accord 1990-2002. I had an auto store run diagnostics on it and the result was a code the man had never seen. Doing so can lead to safety issues a roadside breakdown or costly repairs down the line.
Car complaints car problems and defect information. All it is is a reminder to do a routine check up. If your Check Engine Light is on our Professional Parts People will scan the code for you and provide a list of possible fixes.
A steady check engine light means there is a present issue. It should never be ignored. In some cases you need to pull over immediately to prevent damage while in others you merely need to tighten you gas cap next time you stop in order to reset the service engine soon light.
Recently the check engine light came on. The video above shows how to locate the on board diagnostics OBD plug on your 2001 Civic how to read the trouble codes and how to reset or clear the check engine light using a scanner on your Civic. My husband took our car to our local dealership not the dealership where we bought the car and they charged him 60-80 for the first diagnostic test.
If it is the oil light turn your car on on not. While driving 60 mph on the interstate the check engine warning light illuminated on the instrument panel. I also have a 2001 Civic.
Refer to your service manual for jacking points and jack up your car. Stabilize the vehicle with jack stands and chock the rear tires.
 Bmw Z3 Tie Rod End Replacement 1996 2002 Pelican Parts Diy Maintenance Article
Step 1 Loosen the front tires slightly.

Inner tie rod end replacement. Labor is pricey and youre looking at a minimum of an hours charge. Inner Steering Tie Rod End by Quick Steer. Many vehicles use both an inner and outer tie rod.
When the outer tie rod end allows the wheel play it acts as a hammer and chisel slowing destroying the inner tie rod end ball-in-socket. A tie rod end also aids in aligning the vehicle and most are threaded on one end to allow for adjustment. If the bushing is torn odds are road grit has accumulated inside and destroyed it so you will need to replace the tie rod.
The Basics Behind Inner Tie Rod Outer Tie Rod Replacement Services at Ditos Motors Inc. This way you can safely loosen the lug nutsStep 2 Raise the front end with a floor jack. Heres the breakdown for you.
Frequently the part that wears out in the tie rod end is actually the bushing. New tie rod ends are installed with all fasteners and the adjusting lock nut tightened to the required OEM torque value. Tie rod ends can wear out due to impact constant use on bumpy roads or simple age.
How Much Does Tie Rod Replacement Cost. As an important part of your vehicles steering and suspension system tie rods act as the link between your vehicles steering system and the steering arm. Useful tools On This ChannelTrim Removal.
It is a ball and socket construction that allows the tie rod to move with the vehicles suspension. Picked Fork Kit on Amazon - httpamznto2Hr3Blazer Jimmy S10 Replacement Tie Rod Ends on Amazon - httpamznto2CeBhyVGrease Gun on Amazon - https. Theyre usually only replaced after a traffic accident or other physical damage or when the outer tie rod end fails and damages it.
So to replace one set on one wheel will cost between 40 and 200 because you need the inner and outer rods. This inner tie rod removal tool set makes it easy to replace inner tie rods without removing the rack and pinion. Regardless of the type of steering system in your vehicle you use inner and outer tie rods.
The inner tie rod removal set includes seven SAE and metric adapters to handle a variety of make and model vehicles. If the bushing is solid reach up and grasp the outer tie rod firmly and give it a good shake. It is not safe to leave the vehicle suspended on the jack aloneStep 3 Remove the wheel.
Rate comment on this video then check out my channel SUBSCRIBE for more DIY auto repair videos. In this video I show you how to remove and replace inner and outer tie rod ends. This is a video showing how to re.
Usually the total cost of tie rod replacement is between 45 and 180 including parts and labor. The set is constructed of forged steel and comes organized in a custom case for easy storage and transport. If it easily moves from side to side its time for replacement.
I try to cover all steps and also do a demonstration of how to use the Inner. If youre striving to restore smooth and predictable steering of your vehicle this high-quality replacement steering part is just the ticket. For a tie rod replacement you will generally pay around 70 to 200 for parts and labor.
While on the ground the cars weight will keep the wheels from turning. Httpsamznto2l74F85STANLEY STMT73795 Mixed Tool Set 210 Piece. Tie road replacement is not a huge repair.
This should be done with a tire iron or impact wrench. It is manufactured from durable and long-lasting materials so you can count on proper steering at all times. Your cars make and model will cause the price to go up or down according to how difficult the replacement process is.
Inner tie rods dont typically need to be serviced. The tie rod end attaches the rack and pinion or steering linkage to the steering knuckle. On a rack and pinion type steering system if an inner tie rod end is being replaced the tie rod steering shaft boot is removed and the tie rod unthreaded from the steering rack and the outer tie rod end.
Youre looking at about 20 to 100 per tie rod. Since replacing tie rods is a quick and easy process labor normally costs about 25 to 80 depending on your car model and how easy or difficult its to replace the tie rods on it. However its advised that you replace the tie rod end completely as metal fatigue can also cause the part to fail.
The tie rods dont take long to replace so labor is only going to run you between 30 to 100 for most cars.
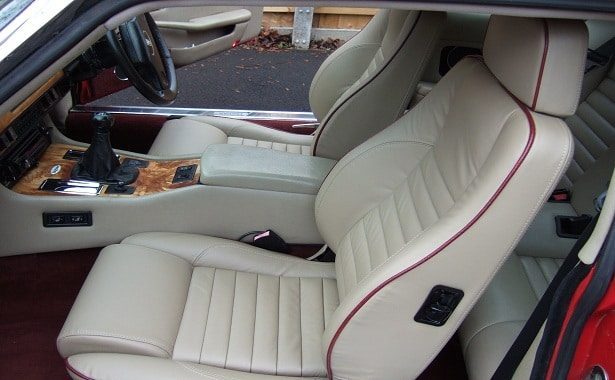
Visit an accessory shop and purchase some attractive upholstery fabric which will suit your. Brent writes Thought Id share with everyone how I build seats from scratch with a step-by-step pictorial.
 Cost To Reupholster A Car In 2021
If thats true for your truck seat.

How to reupholster car seats. He provides custom solutions to your needs and is competent to replace the entire upholstery. How to Re-upholster a car seat wwwjohnhuntupholsterycouk. Remove and replace any worn seat padding.
However using overlock is not compulsory. While putting on the new cloth stretch it as you pass it through the rings on the front part of the seats. How To Reupholster Car Seats From Scratch Purchase desired seat upholstery fabric.
When you fit the new cloth stretch the material to pass it through the rings on the front part of the car seats. Meanwhile car upholstery replacement requires the new material therefore upholstery price guide may be pretty much helpful to save the hundreds of bucks. This how-to guide was originally published in our Auto Upholstery Forum.
Sew the new upholstery together and attach it to the seat. Unbolt the seats and remove them from the car. When you hire a professional to reupholster car seats youre going to be paying the automotive upholstery shop for materials and labor.
For instance if you were to have your car seat upholstered the professional will remove them from the vehicle remove the car seat fabric and replacerepair it will the new choice. Using the appropriate socket wrench detach the seat base from the floor. Make sure that the bolts are firmly re-attached in place so that the seats do not wobble.
Make sure to reattach the bolts firmly to place the seats without them wobbling. After giving this stitch you can use the overlock machine. Trucks are often used hard for good reason.
To reinstall the latch pin for the seat back we used a Phillips head screwdriver to poke a hole in the new seat skin and then reinstalled the pin. Then wrap it around the backside of the bun and staple the ends at the base area. For upholstering car seat you should use everyday stitch machine.
Sometimes the upholstered seat of a truck may take the worst beating of all. Find the best Car Seat Upholstery near you on Yelp - see all Car Seat Upholstery open now. Steps to follow Step 1.
Remove the old car upholstery and use it as a pattern to cut out new upholstery pieces. It goes without saying that replacing the upholstery requires the seats to be removed from the vehicle. In this tutorial video we will show you all the steps required to reupholster the bucket seats on a vintage car.
Put back the seats on the frames and screw the rings back into place. Check out this awesome guide on how to upholster a car seat from scratch submitted by Brent Parker of Brent Parker Motor Trimming in Glenorie Australia. Remove the seat and set it on a work table.
Explore other popular Automotive near you from over 7 million businesses with over 142 million reviews and opinions from Yelpers. Put back the seats on the frame and screw the rings back to their original position. We are working with a 46 Plymouth but the.
If there are any electrical components connected eg power-seat controls detach the connectors. He or she will also check the springs and foam and make the repairs as needed. Treating the Seat Frame.
To remove the seats unscrew the bolts on the floor of the car right underneath the seat itself. A car upholster does work on the replacement of seat carpet or interior trim. The labor includes the removal of current upholstery adding that foam and batting to damaged areas and.
Materials include the fabric selected to replace the current upholstery foam and batting as needed.
Whats a good price on a. Produced since 1953 the E-Class falls midrange in the Mercedes line-up and has been marketed worldwide across five generations.
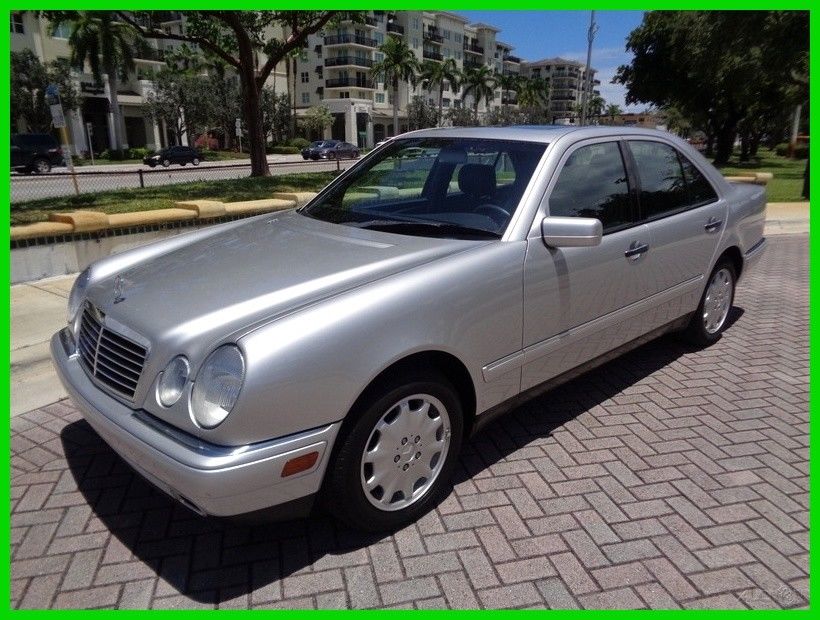 1998 Mercedes Benz E Class E320 40 759 Low Miles 1 Owner 1998 Mercedes Benz E320 40 759 Low Original Miles 1 Owner Clean Fax Low Bin 2017 2018 Is In Stock And For Sale 24carshop Com
E320 4MATIC 4dr Sedan AWD E430 4dr Sedan E300TD Turbodiesel 4dr Sedan and E320 4dr Sedan.
1998 e320 mercedes benz. Get KBB Fair Purchase Price MSRP and dealer invoice price for the 1998 Mercedes-Benz E-Class E 320 Sedan 4D. The 1998 Mercedes Benz E320 is truly the safest car in the world as well as the greatest car ever made since their testing ground for car accidents is in Germany where they are driven at HIGH. Details about 1998 Mercedes-benz E320 STD Ps Pumpmotor 16023747 Comes with Pulley - 6 Month Warranty - Fast and Free Sh.
Every used car for sale comes with a free CARFAX Report. Find the best used 1998 Mercedes-Benz E-Class near you. The Mercedes-Benz E-Class is a range of executive cars manufactured by German automaker Mercedes-Benz in various engine and body configurations.
Back to all cars Popular on NADAguides Top-Rated 2020 Family SUVs in Quality According to Consumers. Get 1998 Mercedes-Benz E-Class values consumer reviews safety ratings and find cars for sale near you. 1998 Mercedes-Benz E320 Prices Founded in 1881 Mercedes-Benz is linked to the very first automobile ever made.
Find the best Mercedes-Benz E-Class E 320 for sale near you. Mercedes-Benz CLK E Class Genuine Emblem Trunk Star CLK320 E320 E300 E430 NEW Fits. View all 59 consumer vehicle reviews for the Used 1998 Mercedes-Benz E-Class on Edmunds or submit your own review of the 1998 E-Class.
Every used car for sale comes with a free CARFAX Report. We have 11 1998 Mercedes-Benz E-Class vehicles for sale that are reported accident free 4 1-Owner cars and 16 personal use cars. 1998 Mercedes-Benz E320 Specs Safety The table below shows all 1998 Mercedes-Benz E320 specs by style including MPG fuel economy transmission details and interior and exterior dimensions.
1998 Mercedes-Benz E320 - 1998 Mercedes-Benz E320 - LOW MILEAGE - 72000kms - M112 Motor 32L 5SP Automatic Transmission RWD - Third owner of this classic well kept Mercedes winter stored and weekend driven - Car is imported from Germany and originally purchased in 1997 at Mercedes-Benz Markham. Save 9794 on a 1998 Mercedes-Benz E-Class E 320 near you. We have 102 Mercedes-Benz E-Class E 320 vehicles for sale that are reported accident free 34 1-Owner cars and 139 personal use cars.
We analyze millions of used cars daily. The Used 1998 Mercedes-Benz E-Class Sedan is offered in the following styles. The German car maker consistently pushes the edge of automotive technology and is often the first brand to market new innovations.
Mercedes-Benz has long been a benchmark to competing luxury car makers. Get Used 1998 Mercedes-Benz Values. Learn more about the 1998 Mercedes-Benz E-Class.
Problem with your 1998 Mercedes-Benz E320. With the new E320 Station Wagon Mercedes-Benz has introduced a car that is essentially obsolete. Our list of 51 known complaints reported by owners can help you fix your 1998 Mercedes-Benz E320.
1998 Mercedes-Benz E320 45 out of 5 stars 12 12 product ratings - Mercedes-Benz CLK E Class Genuine Emblem Trunk Star CLK320 E320 E300 E430 NEW. 1998 E320 Oil Sensor Defective The warning oil sensor defective is showing up on my instrument display cluster. See pricing for the Used 1998 Mercedes-Benz E-Class E 320 Sedan 4D.
The 1998 Mercedes-Benz E320 has 58 problems defects reported by E320 owners. I udnerstand that the lower oil pan has to be removed. Additionally find 1998 Mercedes-Benz E320 warranty and reliability information such as limits on bumper-to-bumper coverage and major components.
Search over 12100 listings to find the best local deals. 1998 Mercedes-benz E320 STD Ps Pumpmotor 16023747. 5 1998 Mercedes-Benz E320 owners reviewed the 1998 Mercedes-Benz E320 with a rating of 39 overall out of 5.
Popular Mercedes Benz Vehicles 2021 Ford F-150 2021 Ram Truck 1500 2021 Chevrolet Silverado 1500. Before 1993 the E in Mercedes-Benz nomenclature was a suffix following a vehicles model number which stood for. Our Take on the 1998 Mercedes-Benz E-Class.
The worst complaints are accessories - interior body paint and engine problems.
These are great for normal street driving. Use an 8 x 125mm bolt and thread it into the drum brake holes.
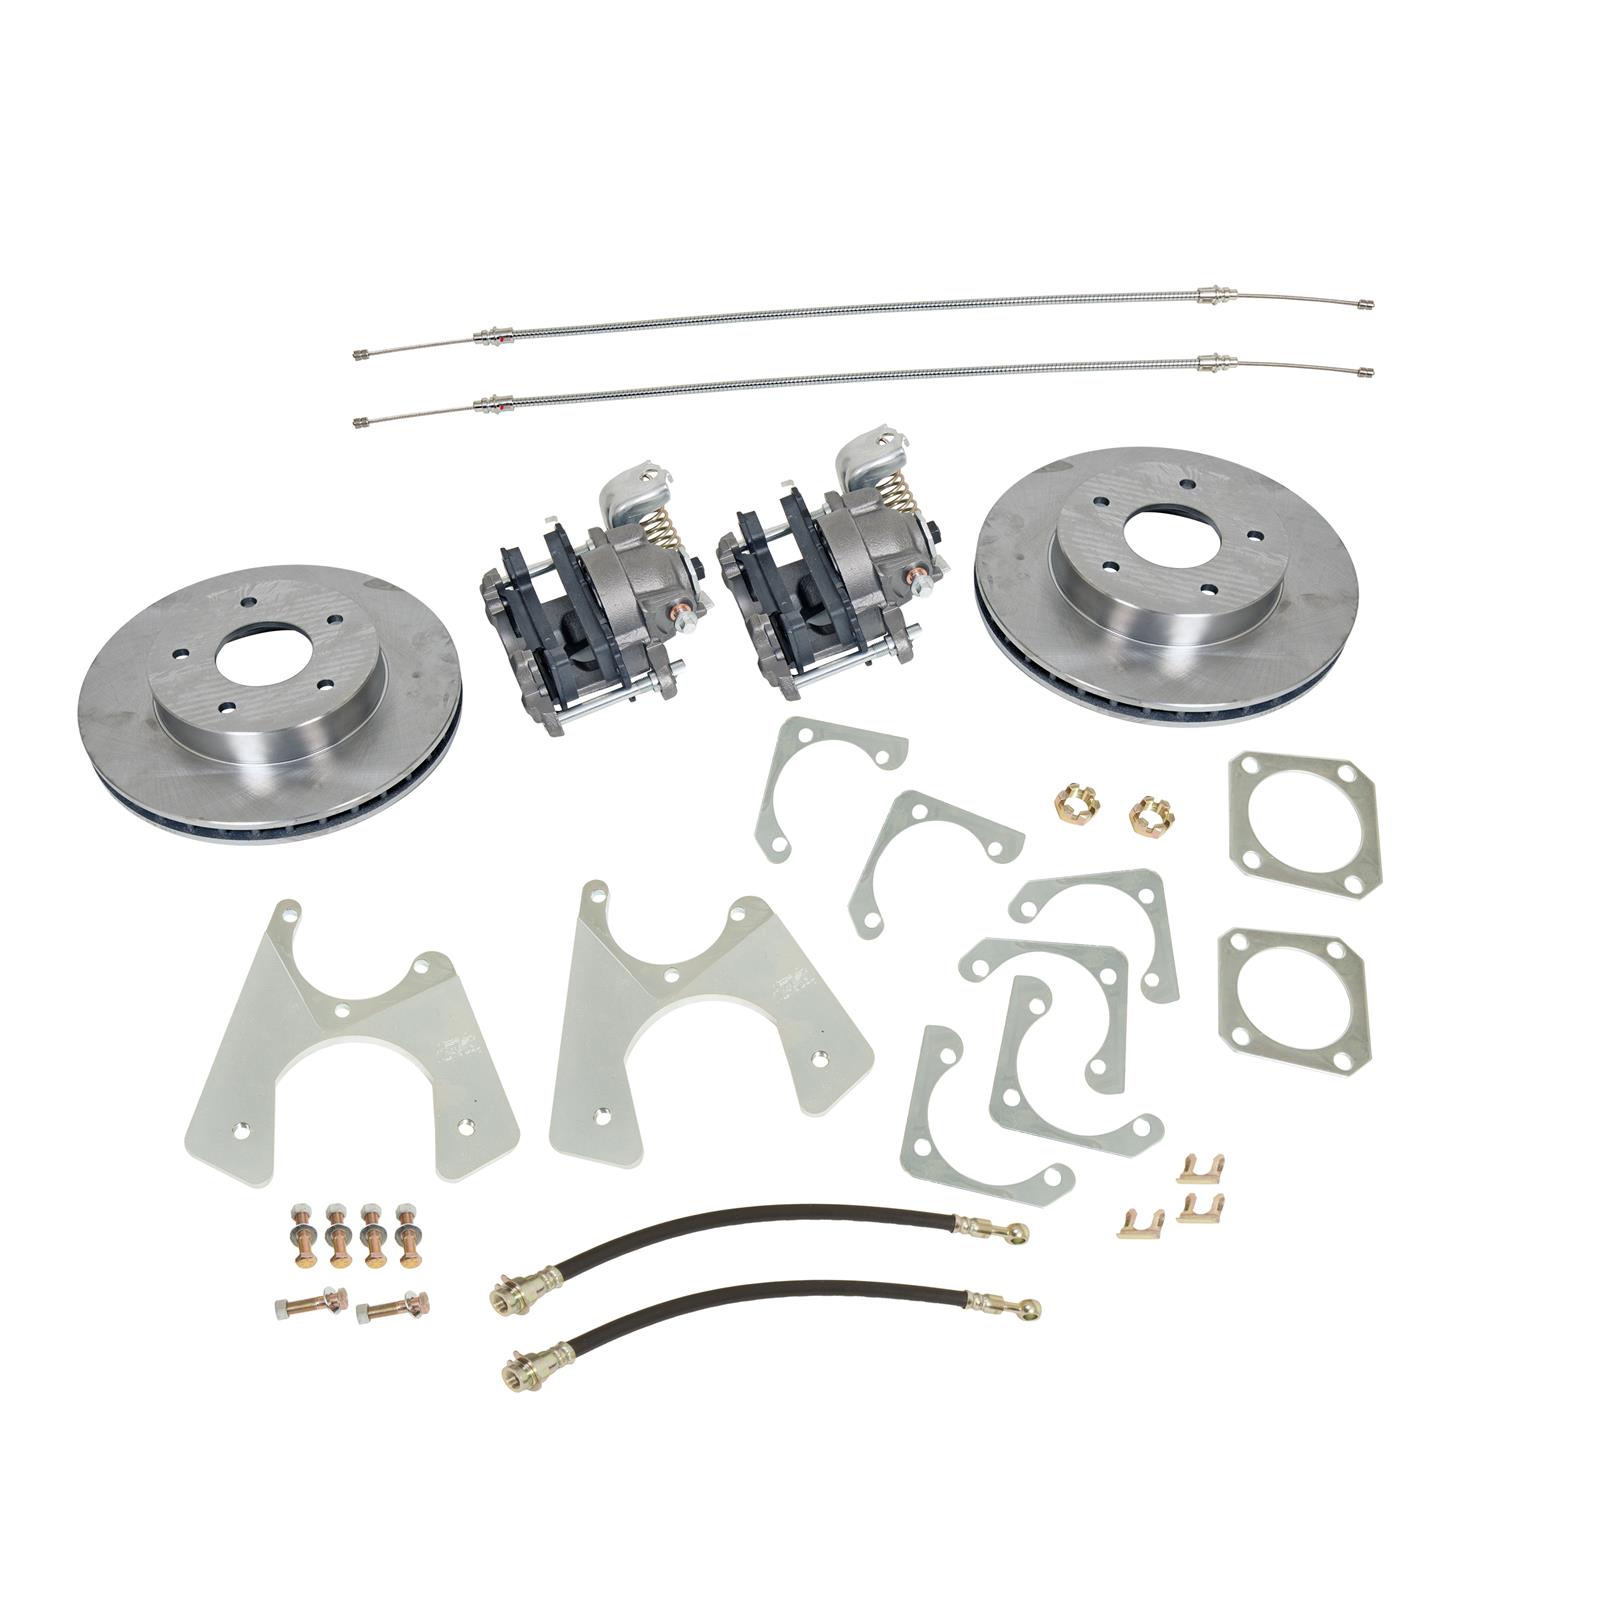 Chevrolet Malibu Summit Racing Sum Bk1623 Summit Racing Rear Drum To Disc Brake Conversion Kits Summit Racing
We have drum to disc conversion kits to fit a wide array of classic cars and trucks LEED Brakes offers top quality drum to disc brake conversion kits for popular Ford GM and Mopar muscle cars and trucks.
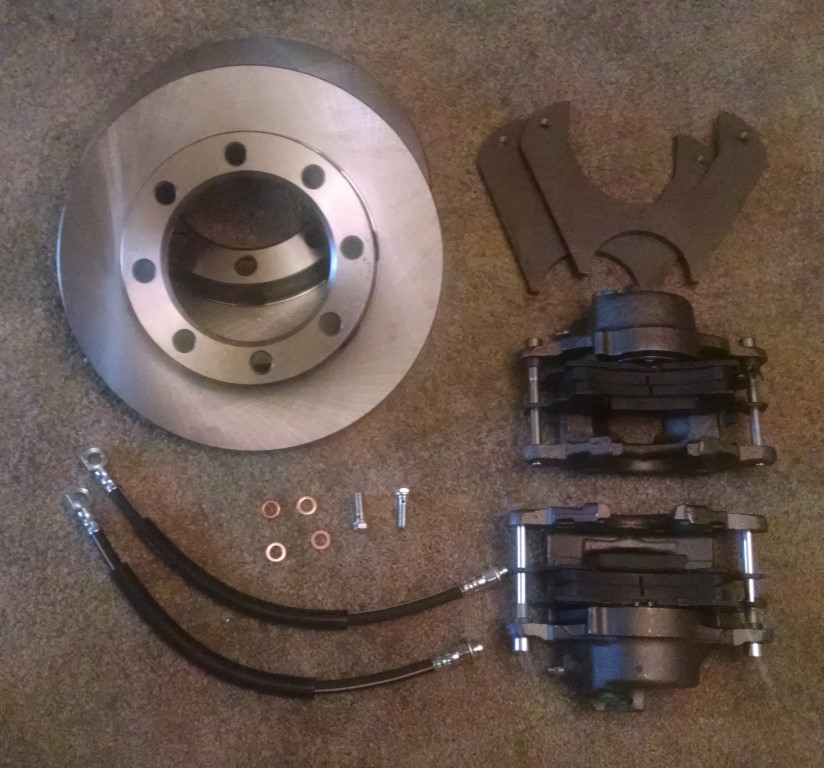
Drums to disc brake conversion. Lift up the vehicle with a jack and remove the tire. The Right Stuff Disc Brake Conversions are the most complete kits in the industry at the right price. Joined Apr 22 2007 114 Posts.
Order the kit recommended for your vehicle application. Browse our selection to find the best front brake conversion kit to suit your needs. Classic Industries Restoration Parts and Accessories - Drum to Disc - Front.
The Disc Brake Conversion Kit contains all the parts needed to replace your drum brakes with disc brakesOlder models of vehicles that come with drum brakes can get an improved performance if their drum brakes are converted to disc brakes. In this video we demonstrate just how easy it is to convert the rear brakes from Drum to Disc using one of our Legend Series Disc Brake Conversion Kits. As drum brakes are susceptible and easily affected by heat and moisture they can lower the stopping power of the vehicle.
Missing mis-calibrated or non-functioning proportioning valve. Also included is a built-in parking brake with a factory style actuation lever for ease of use. Our Summit rear drum-to-disc brake conversion kits take the guesswork and high price tag out of building a braking system.
Im doing my suspension. For a higher level of braking performance check out SSBCs Super Duty Brake Conversion Kit. Performance disc brakes front disc brake conversion rear disc brake conversion brake caliper rotor drilled and slotted name it we have it since 1984.
Gypsy jim Premium Member. The Right Stuff Drum-to-Disc Conversion Kit. Theyre available in a variety of sizes and rotor styles for different axle models and housing flanges.
Then use a flat head screwdriver to remove the dust cap. High quality components professional packaging application specific fit and function and after-sale support by hands on technicians that creates an unbeatable value. Get an MCM Flag for your.
The goal is to keep the rear brakes from locking up under heavy braking. Master cylinders for drum and disc brakes are different. Designed for easy bolt on installation the kit includes complete step by step instructions and industry leading tech support.
Our rear drum to disc brake conversion kits are an easy bolt-on upgrade. Jump to Latest Follow 1 - 2 of 2 Posts. This allows the caliper pistons to retract and allows brake pads to float off the rotors when the brakes are not applied.
Front disc brakes didnt start becoming standard until the late 1970s. A master cylinder for disc brakes must take some of the fluid in the lines back when the brake pedal is released. If you converted the drums to discs you may have a hold-off valve that you dont need.
Before that most vehicles had drum brakes in both the front and rear. The proportioning valve shunts pressure between the front and rear brakes. Best Rear Drum to Disc Brake Conversion for 67 SS Convertible.
How to Convert Drum Brakes to Disc Brakes The Step-by-Step Process The first step is to prepare everything and that includes draining half of the brake fluid from the master cylinder and loosening the lug nuts on the wheel where you will remove the brake drum from. A-Team Performance Power Brake Conversion Kit Firewall Mount DiscDrum or DiscDisc DrumDrum Compatible with Ford 1966-1977 Bronco Booster Master Cylinder 44 out of 5 stars 9 17999 179. Our drum to disc conversion kits utilize an OEM style cast iron caliper with a zinc plated finish for corrosion protection and extended service life.
Leed Brakes complete drum to disc brake conversion kit consists of all new precision machined components. See results below for Camaro 2010-Up Camaro Firebird Chevy II Nova Impala Full Size Chevy GMC Truck Mopar A B and E Body Regal Grand National Tri-Five Chevy Buick Regal and Ford Mustang. Kits are available as.
This will lift the drum covers up to reveal the braking assembly. Without this feature disc brakes would drag. Discussion Starter 1 4 h ago.
The boys do a budget disc brake conversion to update the old broken drums on 2SEXY in preparation for its shakedown at the track. For more recent cars and trucks equipped with rear drum brakes the SSBC Stock Drum-to-Disc Brake Conversion Kit features OEM-level replacement calipers and rotors. Drum to Disc Brake Conversion If youre working on restoring a classic car or truck chances are the vehicle has drum brakes.
Reconnect the battery terminal and tighten the nut with a wrench. Check here for special coupons and promotions.
 Alternator 2003 Honda Accord V6 3 0l 10480497 31100 Rca A01 8296 2003 Honda Accord 3 0l
Put the accessory belt back on and tighten them by pulling the alternator to the front of the car.
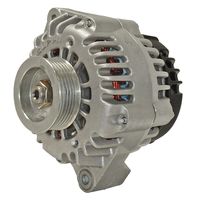
2003 honda accord alternator. Average repair cost is 450 at 110000 miles. 2003 Honda Accord Alternators Generators Related Parts. Alternators dont always go bad in the exact same way.
They did their job well. On top of low prices Advance Auto Parts offers 5 different trusted brands of Alternator products for the 2003 Honda Accord. 2003 Fuse block Engine compartment Number Ampere rating A Circuits Protected 1 10 Left Headlight Low 2 30 Rear Defroster Coil 3 10 Left Headlight Hi 4 15 Small Light 5 10 Right Headlight Hi 6 10 Right Headlight Low 7 75 Back Up 8.
Product is complete and in great condition. Here at Advance Auto Parts we work with only top reliable Alternator product and part brands so you can shop with complete confidence. 10 minutes and some change.
Your order may be eligible for Ship to Home and shipping is free on all online orders of 3500. They still use a belt driven three phased alternator and an internal electronically controlled voltage regulator that has three main functions. Alternators dont always go bad in the exact same way.
Buy online and pick up in store or get fast free delivery on qualified orders. Shop AutoZone for 2003 Honda Accord Alternator. 2003 Honda Accord Alternator.
Compatible with Accord Element Tsx. 2003 Honda Accord Alternator Generator Bearings. 2003 Honda Accord Drivebelt Kit Program.
Used 2003 HONDA ACCORD ALTERNATOR - Johns Truck and Auto Salvage. We currently carry 13 Alternator products to choose from for your 2003 Honda Accord and our inventory prices range from as little as 13799 up to 25559. Quality-Built OE Replacement Alternator New.
Find 220 HIGH AMP NEW Alternator Generator 2007-06 2005 2004 2003 Honda Accord 24L in San Mateo California US for US 24543. The regulator controls the pulse-width of the field rotor voltage. Select Vehicle Year X.
When it comes to your Honda Accord you want parts and products from only trusted brands. To continue please select the year for your. 24l 2004 2005 2006 04 05 06 Honda replace remove removal installRust Belt Auto shir.
Order Alternator for your 2003 Honda Accord and pick it up in storemake your purchase find a store near you and get directions. Swap out your old alternator for a new Honda Accord alternator and take advantage of AutoZones Same-Day Store Pick-up if you need your aftermarket part right away. The longer the field rotor is on the more.
Alternator 31100-RAA-A05 for Honda Accord Element Acura TSX L4 24L. Honda Accord 2003 fuse box diagram Year of production. Bosch 2 Duralast 2 Duralast Gold 2 Valucraft 1 This is a test.
How to fix or replace an alternator. The 2003 Honda Accord has 2 problems reported for alternator and battery failure. Car complaints car problems and defect.
The best part is our Honda Accord Alternator products start from as little as 6362. 24L Acura Tsx 2004-2008 Csc29 Honda Accord 2003-2007 20L Civic 2006-2011 24L Cr-V 2007-20111 Element 2003-2011. DB Electrical AND0257 Remanufactured Alternator Replacement For.
Arrived on time well packaged and as expected. A bad alternator can leave your Honda Accord without power and unable to move. Get a free detailed estimate for a repair in your area.
2003 Honda Accord Starters Solenoids Related Parts. No matter the situation Advance Auto Parts has the Alternator product you desperately need. More Buying Choices83882 new offers Amazons Choicefor 2003 honda accord alternator.
47 out of 5 stars48. A worn-out alternator ruins a good battery if you dont replace it quickly. Or you may just be struggling to keep it highway-approved.
A Honda Accord Alternator Replacement costs between 832 and 913 on average. HondaAcura charging systems appear to be similar to other manufacturers. 1-7 of 7 Results.
Tighten the adjusting bolt on the alternator and then the bottom bolt using the socket and ratchet. New Alternator 13980 For Acura TSX 24L 04-05 Honda Accord 24L 2003-2005 12V. 2003 Honda Accord Alternator Customer Reviews.
Well cover the symptoms of when an alternator goes bad and how to diagnose a bad one which is really pretty easy. Batteries are rechargeable only so many times before they lose their ability to hold a charge. You can buy alternator here with free shipping and manufacturers warrantyhttpsamznto2Bk3glSif you dont have Amazon get a free 30 day trial and free s.
1-7 of 7 Results. Put the power steering pump back on and tighten the bolts with the wrench. Johns Truck and Auto Salvage used-parts.
Set of 4 Tire Presure Monitoring Sensors TPMS that are already programmed for 2010 Saturn Vue. Dont use the maximum pressure indicated on the sidewall of your tires.
 How To Reset Saturn Vue Tpms Tire Pressure Monitoring System Light
Saturn Vue 45 out of 5 stars 13 13 product ratings - TIRE PRESSURE SENSOR TPMS OEM 25920615 60 day Warranty 315 MHz TS-GM07.

Saturn vue tire pressure. View the recommended tires for your 2008 Saturn Vue plus important information about Saturn Vue tire pressure tire size and speed rating. Drop it off at our shop and pick it up a few hours later or save time and have our Delivery mechanics come to you. As one of our tire technicians Brianna explains You want to find the correct size for your tire.
2008-2010 Saturn Vue Low Tire Pressure Sensor Light The Saturn Vue was a Sports Utility Vehicle Compact Crossover SUV produced by Saturn Corporation a General Motors subsidiary. 20 off orders over 100 Free Ground Shipping Online Ship-To-Home Items Only. Choose top quality brands AC Delco API DIY Solutions Denso Dorman Huf Schrader Valves Standard Motor Products TYC VDO.
If the light is on and steady it means that the pressure in one or more tires is too. Your vehicle cant drive correctly without the correct tires. 20 off orders over 100 Free Ground Shipping.
This quick video will help you reset it so you dont need to make another trip. Free Same Day Store Pickup. The model was the top-selling vehicle of the Saturn brand and was made from autumn 2001 to early 2009.
2005 Saturn VUE tire sizes. Dont use the maximum pressure indicated on the sidewall of your tires. Find your perfect car with Edmunds expert reviews car comparisons and pricing tools.
Get a free detailed estimate for a repair in your area. How to reset the Tire Pressure Monitoring System TPMS on a 2008 Saturn Outlook and other GM models with the same TPMS and display. Checking the tire pressure in your 2006 Saturn Vue is relatively easy and important to do on a regular basis.
The 2008 and 2009 Saturns have a built-in feature that alerts you when your tire pressure is under or above the recommended pressure level. Open the driver side door on your Vue and look for a sticker that indicates what the tire pressure should be. Find tire sizes for each 2005 Saturn VUE option.
2010 Saturn Vue TPMS Sensor for Tire Pressure 4Pack 6999. Our high quality TPMS Sensors are optimal for use in all weather conditons and all vehicle types. We have the best products at the right price.
We currently carry 9 Tire Pressure Sensor Service Kit products to choose from for your 2009 Saturn Vue and our inventory prices range from as little as 399 up to 899. TIRE PRESSURE SENSOR TPMS OEM 25920615 60 day Warranty 315 MHz TS-GM07 Fits. Equip cars trucks SUVs with 2009 Saturn Vue Tire Pressure Monitoring Sensor from AutoZone.
Buy a 2008 Saturn Vue Tire Pressure Monitoring Sensor at discount prices. Saturn Vue Tire Pressure Sensor Replacement RepairSmith offers upfront and competitive pricing. Here at Advance Auto Parts we work with only top reliable Remote Tire Pressure Sensor product and part brands so you can shop with complete confidence.
Check out free battery charging and engine diagnostic testing while you are in store. Open the driver side door on your Vue and look for a sticker that indicates what the tire pressure should be. The best part is our Saturn Vue Remote Tire Pressure Sensor products start from as little as 4299.
The average cost for Saturn Vue Tire Pressure Sensor Replacement is 212. We offer a 1-year warranty on our sensors. Checking the tire pressure in your 2008 Saturn Vue is relatively easy and important to do on a regular basis.
The feature includes an alert light that starts flashing on your cars instrument panel. Have a tire pressure light on in your Saturn Aura OR other GMC model vehicle. Take it from one of our tire technicians Brianna.
You want to find the correct size for your tire. A Saturn Vue Tire Pressure Monitoring System Relearn costs between 35 and 44 on average. When it comes to your Saturn Vue you want parts and products from only trusted brands.
On top of low prices Advance Auto Parts offers 2 different trusted brands of Tire Pressure Sensor Service Kit products for the 2009 Saturn Vue. View the tires Saturn recommends for 2006 Vues plus helpful information about Saturn Vue tire size speed rating and tire pressure. Order Saturn Vue Tire Pressure Monitoring Sensor online today.
Save money on one of 5 used Saturns in Fremont CA.
Spread the glue on the. Make sure to let it dry before you continue.
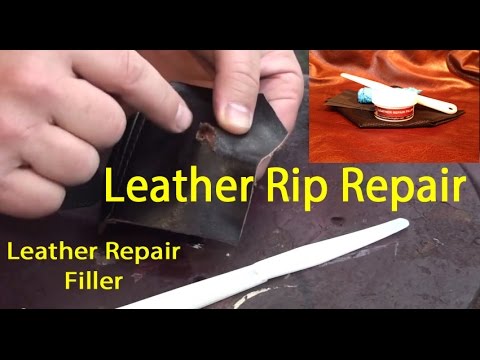 Leather Repair Filler Leather Tear Repair How To Fix A Tear In Leather Youtube
If you are new you can practice on a leather piece first.

How to repair ripped leather. Wipe the leather surrounding the tear with a damp soft dye-free cloth. For all kits used in this videoUK. This clears away any grease or dirt to prepare the surface for leather glue.
Gluing the Tear Together 1. To me using a leather patch and adhesive is the best way to repair large tear in leather car seat. ASSESS DAMAGE CHOOSE SUITABLE PRODUCTThe tear we are fixing is no larger than a tennis ball so we have.
Backing The backing is required for any types of car seat tears. If the edges of the tear are uneven trim them very carefully so they are not as ragged. This video demonstrates how to repair a tear in leather.
REPAIRING A TEAR ON A LEATHER SOFA STEP 1. Then pour foam solution or alcohol on clean cloth or scrubbing pad and gently wipe the sites and surrounding areas to get a clean work surface. Ive described the whole process elaborately above.
Apply a small amount of fabric glue to a toothpick. Let it dry before adding colorant. Unpack the contents of your leather repair kit.
You could choose one like this from Fortivo which has all you need for a repair. To repair a tear in leather purchase a leather repair kit. Use a leather repair kit and tuck the backing under the damaged area to form a patch.
If you walk around with tools in your pockets dont be surprised if you tear a hole in your leather car seat sofa or easy chair. This helps remove oils and contaminants scuff the manufactured surface and. If the size of the tear warrants it you can use the entire piece otherwise you will need to trim it to fit the tear.
With regular use a cleaner and conditioner can protect your leather seats from drying fading and cracking. Gently sand the area with an abrasive pad if one is included with the leather repair kit or use a fine-grit sandpaper. You need to hold it taut while you apply the glue so it might be helpful to have someone else hold the leather while you glue it.
You can buy a leather repair kit that usually comes with the patch material needed to fix a tear in your leather couch. This will create a firm backing material for you to glue the tear to. You can do this without measuring if.
STEP BY STEP GUIDE. Hold the ripped portion down and apply quick drying glue on top of the seam where its ripped. If the rip is more than two inches long or a half-inch wide then consider having it professionally treated.
To keep your leather seats looking great regularly use a product vinyl leather and rubber to clean and condition them. The leather repair kit will come with a piece of patch leather. For a tear on your leather couch you will need to insert a piece of patch material into the damage itself.
I hope youll easily understand the process and get the task done. Do not let excess alcohol sit on the surface as it can damage glossy fully-finished surface coats. Cut a portion of the patching fabric out to be slightly bigger than your tear.
Step 2 Super Gluey. Open the bottle of glue and squeeze out a drop onto the end of a. Using this technique you could also repair a hole split or rip.
Standard craft or super glue can leave residue behind and possible. Gently rub 70 isopropyl alcohol over any small flaps or gouges in the surface. Use a white or light cloth to ensure no color bleeds onto the leather.
TRIMPREP THE AREAThe next step is to take a scalpel or a pair of sharp sciscors and trim the worn edges off. Small tears cracks and scratches on genuine leather are easily repaired with sandpaper and super glue. Cut the piece of leather to be slightly larger than the tear.
Apply a leather cleaner if desired to remove. In case the damaged edges curl outward cut the edges off with the scissors to gain a tidy repair. If the leather is worn-out follow these steps to repair it.
Get some nitrile gloves and a leather repair kit. Inserting Your Repair Patch 1. Take the backing material and cut a piece the same shape as but slightly larger than your tear.
Trim any loose strips off of the. If you have a large area of worn rough leather spread the filler over it smooth with the card and then with your hand inside a plastic glove pat the filler to texturize it so you dont end up with a large noticeably smooth area. Use leather or fabric glue on to repair the tear.
Apply the adhesive to the edges of the patch and place it under the tear and apply pressure. Better close-up videos and free written instructions. Once dry gently sand with 500-grit paper.
Then apply adhesive around the edges and the middle. Clean the area with rubbing alcohol and a soft rag.